Table of Contents
- Introduction
- Physical Connection
- Enumeration: How the Computer Discovers the Device
- Drivers: Giving the Device a Brain
- Storage and File System Detection: Making the Files Accessible
- User-Level Integration: From Mount Point to File Manager
- Conclusion
- Bibliography and further reading
Introduction
Have you ever plugged in a USB (Universal Serial Bus) stick and wondered how it just shows up on your desktop within seconds? What seems like a simple act actually triggers a complex chain of events across multiple layers of your computer, from electrical signals to user-friendly file managers.
This article aims to demystify that journey step by step, focusing on what happens inside a modern Linux system when you insert a USB stick.
We will explore everything, starting from the moment the connector makes contact, through stages like hardware detection, device identification, driver loading, file system mounting, and finally, user-space integration.
We will cover:
- How USB devices are physically and electrically detected
- How the Linux kernel enumerates and identifies USB devices
- How drivers are selected and loaded
- How partitions and file systems are recognized and mounted
- How desktop environments like GNOME (GNU Network Object Model Environment) display the device to the user
At each step, we will highlight what is going on under the hood, whether it is a voltage signal on a wire, a kernel log message (useful for observing events), or a user-space daemon that goes into action.
By the end of the article, you will have a clear and layered understanding of what happens between inserting a USB stick and accessing your files.
Let’s start at the very beginning: how does the computer even notice that a USB device was inserted?
Physical Connection
When you plug a USB stick into your computer, the very first thing that happens is physical: it is all about metal contacts, electricity, and voltage levels.
A USB 2.0 connector (like USB-A) includes four essential lines: two for power (VBUS and GND), and two for data (D+ and D−). USB-C introduces many more pins, but the core idea remains the same.
Info
USB has evolved from the original USB 1.0 (released in 1996) through USB 2.0 (2000) up to USB 3.x and USB4 today, each new version bringing higher bandwidth and new protocol nuances.
As soon as the device is physically connected, the USB port supplies power via the VBUS line. This powers up the microcontroller inside the USB stick, which starts executing firmware to prepare for communication.
The first electrical signal that indicates a device is present is a pull-up resistor on one of the data lines (D+ or D−) inside the USB device. This resistor connects the line to a high voltage level (3.3 V), instead of leaving it in a ground or “floating” state. The host checks which data line is pulled high:
- D+ pulled high: Full-speed device
- D− pulled high: Low-speed device
| Pull-up on | Device speed |
|---|---|
| D− | Low-speed (1.5 Mbps) |
| D+ | Full-speed (12 Mbps) or High-speed (480 Mbps, USB 2.0) |
Once the host detects this pull-up resistor, it knows a device is connected and begins the enumeration process (which we will cover in the next section).
At this point, the USB stick is electrically active but not yet recognized as a storage device by the operating system.
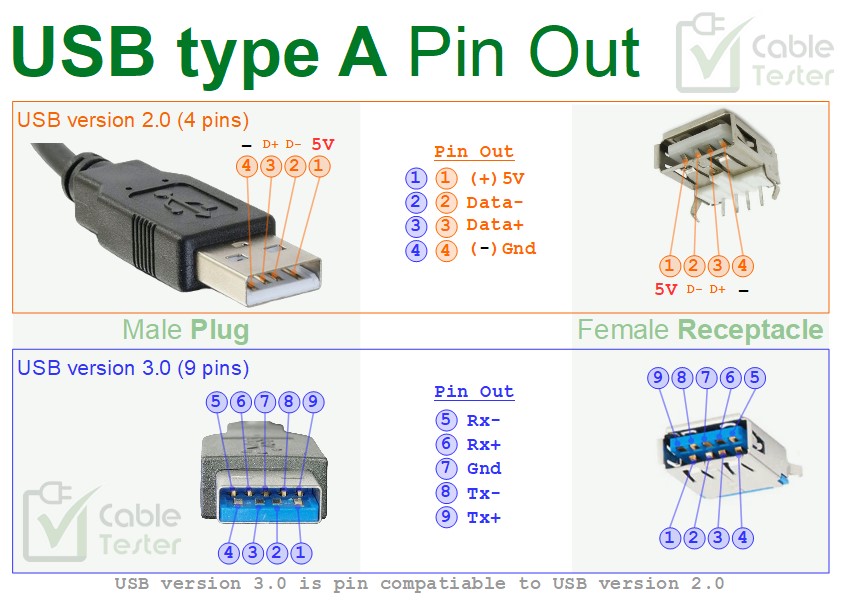 Figure 1 - USB Type-A pinout showing VBUS, D+, D−, and GND.
Enumeration: How the Computer Discovers the Device
Once the USB stick is physically connected and powered, the next critical step is enumeration. This is how the host (your computer) discovers, identifies, and configures the device so that it can be used properly.
What is Enumeration?
Enumeration is the process through which the host system detects a new USB device and gathers all the necessary information to use it: what it is, how it communicates, and which driver it needs.
It is a bit like introducing yourself at the entrance of a building:
- You ring the bell (electrical detection)
- Someone opens the door and asks who you are
- You show your ID (descriptor)
- They give you a visitor badge (device address)
- Finally, they show you the way (driver binding)
If the USB stick could talk, it might say:
“Hi, I am a USB 2.0 device made by SanDisk. I need up to 200 mA of power and I support mass storage. Here is how to talk to me.”
More technically, enumeration is a process managed by the USB host
controller (the hardware) and the USB stack in the operating system (like
usbcore in Linux). The device provides structured information called
descriptors that describe its identity and capabilities.
You can observe enumeration in action using tools like dmesg or lsusb.
Step-by-Step: Enumeration Flow
-
Bus Reset Signal: After detecting a device, the host sends a reset pulse by holding D+ and D- on the USB data lines. This brings the USB device into its initial state, clearing any previous state.
-
Device Descriptor Request: The host sends a request to address 0, asking for basic information. The device replies with its device descriptor, which includes:
idVendor(like SanDisk)idProduct(device model)bcdUSB(USB version supported)bMaxPower(maximum current needed)
If a descriptor request times out, the host retries up to three times before failing the enumeration.
-
Address Assignment: The host sends a command to assign the device a unique number used in future communications. 1
-
Full Descriptor Retrieval: The host asks for more detailed descriptors:
- Configuration descriptor: how the device can be set up
- Interface descriptors: what functions the device provides
- Endpoint descriptors: communication channels used for data transfer
-
Driver Binding: Based on the descriptors, the system selects and loads the correct driver. For a USB stick, it is usually the
usb-storagedriver.
Info
In USB, each device on a bus shares the same data lines and must be assigned a unique address. When first connected, all devices default to address 0 until the host assigns a permanent one.
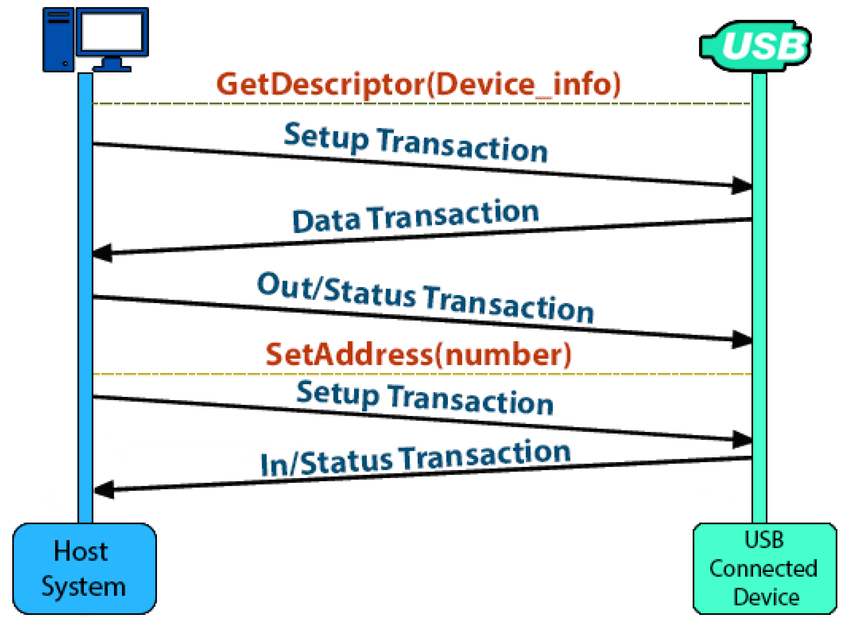 Figure 2: Enumeration flow from device detection to driver binding.
Try it yourself
Plug in a USB stick and run:
|
|
Look for an output like this:
|
|
This shows the enumeration steps in action:
- The host detects the device (new SuperSpeed USB device)
- It retrieves the vendor ID 6557 and product ID 0032
- It assigns a device address (device number 2)
- It loads the usb-storage driver for mass storage
Now try:
|
|
Look for a block like:
|
|
This corresponds to the device descriptor sent during enumeration. You can match:
idVendorandidProductwith those fromdmesgiManufacturer,iProduct, andiSerialwith the stringsbcdUSB 3.20tells you the USB version (3.2 in this case)
You’ll also find the configuration, interface, and endpoint descriptors:
|
|
This tells Linux it is a mass storage device using the SCSI protocol over bulk transfers.
You just watched enumeration happen in real time using only built-in tools.
Drivers: Giving the Device a Brain
Once the device is enumerated and the operating system understands what it is, the next step is to load a driver, a piece of software that knows how to communicate with the device and make it usable by the system.
What is a Driver?
A driver acts as a translator between the hardware and the operating system. It exposes a standardized interface so that applications and system components can interact with the device without needing to know the details of its inner workings.
In the case of a USB stick, the driver handles data transfer commands, error checking, and communication with the storage layer of the OS.
How Linux Chooses a Driver
During enumeration, the kernel looks at the device’s descriptors, especially
the idVendor, idProduct, and class codes, to determine which driver to
bind.
Linux uses three main strategies to find the right driver:
- Class matching: If the device reports a known USB class (Mass
Storage, HID, Audio, Keyboard…), the kernel loads a generic class driver
like
usb-storage. - Vendor/Product ID matching: If a specific
idVendor/idProductpair is registered in a driver’s device table, it will load even if the class is unknown. - User-defined overrides: Through tools like
usb_modeswitchor custommodproberules, users can override driver binding.
Most USB sticks match the Mass Storage class and automatically load the
usb-storage driver.
You can observe driver binding in dmesg:
|
|
Driver Binding in Practice
The kernel matches the device to a driver, and loads it automatically. Once this
happens, a new device file may appear (like /dev/sdX for a USB drive), and the
device becomes available to user space.
Tip
You can confirm the appearance of this device using commands like lsblk
or by comparing the output of ls /dev/sd* before and after plugging in the
USB. You could also use again dmesg to watch the events.
The loaded driver is also visible in system logs and internal kernel structures. It is what makes the USB stick “come to life” from the OS’s perspective.
Without the correct driver, the device would remain silent and inaccessible, just a powered-up piece of hardware with no way to communicate.
Info
The kernel probes each matching driver’s probe() function. These are defined
in kernel modules like drivers/usb/storage/usb.c. The driver can reject or
accept the device, and if accepted, it registers itself as the handler for
future I/O to that USB interface.
A full recap flow could be the following:
| Step | Component | Description |
|---|---|---|
| Device detected | usbcore | Device structure created |
| Descriptor parsed | usbcore | Class and vendor/product identified |
| Match found | Kernel | Matches against known drivers |
| Driver loaded | Module loader | Loads driver (like usb-storage) |
| Driver binds | Driver subsystem | probe() called, device now fully managed |
Storage and File System Detection: Making the Files Accessible
Once the USB stick is recognized and the appropriate driver is loaded, it is time to actually make use of the data it holds. That means understanding what is on the device and how to access it.
This process involves two key steps:
- Detecting partitions
- Recognizing and mounting the file system
Let us walk through both of them.
Partition Detection
Most USB sticks are partitioned, meaning their storage is divided into one or more logical sections, just like a hard drive. Each partition typically contains a file system.
To detect these partitions, the Linux kernel uses the block device layer.
Once the usb-storage driver is active, it exposes the device as a block device
under /dev, like /dev/sdb.
Then, the kernel probes for partitions, creating entries like:
/dev/sdb1- first partition/dev/sdb2- second partition (if present)/dev/sdbX- additional partitions
These entries correspond to the actual partitions found on the USB stick.
Partition detection relies on the presence of a valid partition table: usually either MBR (Master Boot Record) or GPT (GUID Partition Table) 2. If no partition table is found, the system may treat the whole device as a single volume.
MBR is the older standard, storing partition info in the first 512 bytes of the device. It supports up to 4 primary partitions.
GPT is more modern and flexible, used on UEFI systems. It allows many partitions and includes redundancy.
You can observe this using lsblk or once again by using dmesg
File System Recognition
Each partition usually contains a file system, a structured way to store files and directories. Common examples include:
| File System | Notes |
|---|---|
| FAT32 | Almost universally supported, common on USB drives |
| exFAT | Modern alternative for large files, good cross-OS |
| NTFS | Windows native |
| ext4 | Linux native, not always readable on Windows/macOS |
To identify the file system, Linux uses either kernel logic or user-space tools
like blkid to read magic numbers and file system metadata.
Try it yourself (your device might be /dev/sdb1 or /dev/sdc1, use lsblk -f
to check):
|
|
This tells us:
- The filesystem type is
ntfs(used by Windows) - The partition has a label (“USB (E:) [64GB]”) visible in file managers
- The UUID is a unique identifier used to mount the device consistently
PARTLABELandPARTUUIDare used by GPT partition tables for identification
These details are used by system services to decide how and where to mount the file system.
Mounting the Partition
After the file system is recognized, the system can mount it, attaching it
to the Linux directory tree so it can be accessed by applications.
Mounting associates a block device like /dev/sdb1 with an arbitrary mount
point such as /media/usb/, /media/usb/ or a path of your choice.
Mounting can happen:
- Automatically, via user-space daemons like
udisks2 - Manually, using the
mountcommand
|
|
Once mounted, the data becomes fully usable. Files can be opened, edited, copied, or deleted just like any local directory.
If the file system is corrupted or unrecognized, mounting may fail.
User-Level Integration: From Mount Point to File Manager
After the USB stick has been mounted by the system, the final step is presenting it to the user in a friendly and intuitive way, typically as an icon on the desktop or a new entry in the file manager.
This part is handled by user-space components that sit on top of the kernel and make the system interactive and usable.
Let’s break down the key actors involved in this process:
udisks2: The Storage Daemon
udisks2 is a system service that listens for new storage devices. When a new
block device like a USB stick appears, it:
- Detects the device and its partitions
- Identifies the file system type
- Mounts it automatically
- Applies policy rules (who can mount, where it mounts)
It provides a standardized D-Bus API that lets graphical environments
interact with storage safely, without requiring root access or manual mount
command.
GVfs and GIO: The Virtual File System Layer
Many Linux desktop environments (like GNOME) use GVfs (GNOME Virtual File System) and GIO (GNOME Input/Output), a library that provides VFS APIs for developers. 3
GVfs sits on top of udisks2, and:
- Listens for mount events via D-Bus
- Registers devices as virtual volumes
- Integrates them into the file manager (with icons, labels…)
- Handles user permissions and actions like unmount/eject
This is why a device like /dev/sda1 can show up as “USB 64GB” with a proper
icon in the sidebar.
GVfs also handles unmounting: when you click “Eject”, GVfs tells udisks2 to safely unmount and remove the device.
Nautilus and File Managers
Once the device is mounted and GVfs has registered it, the file manager (like Nautilus in GNOME or Dolphin in KDE) will display the USB stick.
From there, the user can:
- Browse files or folders
- Copy or move data
- Rename the volume
- Safely eject the device (which triggers
udisks2to unmount it properly)
Everything is done through a clean graphical interface, but underneath, it is a complex chain of kernel events, D-Bus messages and GUI responses.
At this point, the journey is complete: what began as a physical event has become a fully integrated part of the desktop environment. It is now accessible through a simple double-click.
Conclusion
What seems like a simple gesture is, in fact, a remarkable journey through layers of hardware and software.
We have followed the path step by step:
- From the physical connection, where power flows and signals establish contact,
- Through enumeration, where the host identifies and configures the device,
- To driver handling, where the kernel loads the appropriate module,
- Followed by storage detection and mounting, where partitions and file systems are recognized,
- And finally to user-level integration, where the desktop makes the device visible and accessible.
This chain of events spans from electrical pins all the way to polished user interfaces, and it all happens in just a few seconds.
Understanding this process not only satisfies curiosity, but also provides insight on how modern operating systems interact with hardware. It highlights the complexity of the layers that make a system both powerful and user-friendly.
So the next time you see your USB stick appear on your screen, you will know: behind that click are many subsytems working for you.