Introduction
This article will cover all necessary technical aspects to understand the topic, which means that there are no prerequisites. It aims to discover a wonderful but invisible world : steganography.
Steganography is the practice of concealing information within another medium. The objective is to hide the existence of the message while cryptography only makes the message unreadable. That means an image with a secret message looks exactly like a regular image.
This practice goes way back. The first recorded uses of steganography can be traced back to 440 BC in Greece, when Herodotus mentions two examples in his Histories. Histiaeus sent a message to his vassal, Aristagoras, by shaving the head of his most trusted servant, “marking” the message onto his scalp, then sending him on his way once his hair had regrown.
Note
To reduce a maximum the size of the code examples, every python code in this article will admit those imports :
|
|
Different steganography techniques
Back in time, steganography was made using tatooes, texts written on wax tablets, etc. It has evolved over history and nowadays the main moderns mediums are digitals. In fact, several file types can be used :
- Text : Hiding messages using whitespace, homoglyphs (like Cyrillic “а” for Latin “a”), or encoding bits in formatting.
- Network steganography : Hiding data in unused or redundant protocol fields (e.g., TCP/IP headers).
- Audio and video : Using inaudible frequencies or imperceptible video frame changes.
- Images : Modifying pixel values in imperceptible ways (the focus of this article).
Spacial vs Frequency domain
Steganographic methods are often categorized into :
- Spatial domain: Direct manipulation of pixel values, e.g., LSB (Least Significant Bit).
- Frequency domain: Embedding data in transformed coefficients, such as DCT (Discrete Cosine Transform) used in JPEG compression.
Common techniques
There are many techniques and use cases of computing steganography, the most popular are :
- LSB (Least Significant Bit): Replaces the least important bits of pixel values with bits from the secret message. Simple, but fragile.
- DCT-based methods: Embed data in the transform domain (used for JPEGs). More robust but harder to implement.
- Palette-based methods: Modify indexed color palettes (mostly in GIFs and PNGs).
- Watermarking: Similar in approach but usually for copyright protection, not secrecy.
Each method trades off imperceptibility, robustness, and payload size. For educational purposes, LSB is ideal : simple to implement and highly illustrative. Thus, we will use LSB as an example in this article.
The PNG Format
PNG (Portable Network Graphics) is a widely used image format designed to replace GIF, offering lossless compression, support for transparency, chunk-based structure.
Lossless compression
A lossless compression means that no data is discarded. After reconstruction, every pixel remains as-is, which is crucial for precise bit-level data embedding. It is possible because most real-world data exhibits statistical redundancy.
Color types
PNG files can store images in several color types :
- Grayscale (1 channel)
- RGB (3 channels)
- RGBA (4 channels, with transparency)
- Indexed color (using a color palette)
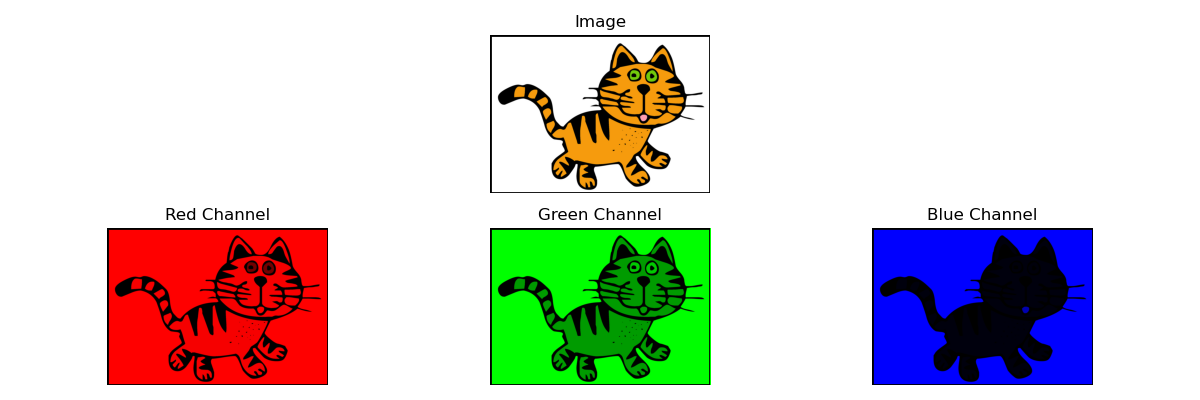
We’ll focus on RGB images for clarity. Each pixel in an RGB image consists of three values: red, green, and blue, each ranging from 0 to 255 (or 8 bits). That means each pixel has 24 bits of color information.
Here is a visualization of the 3 channels of an RGB image:
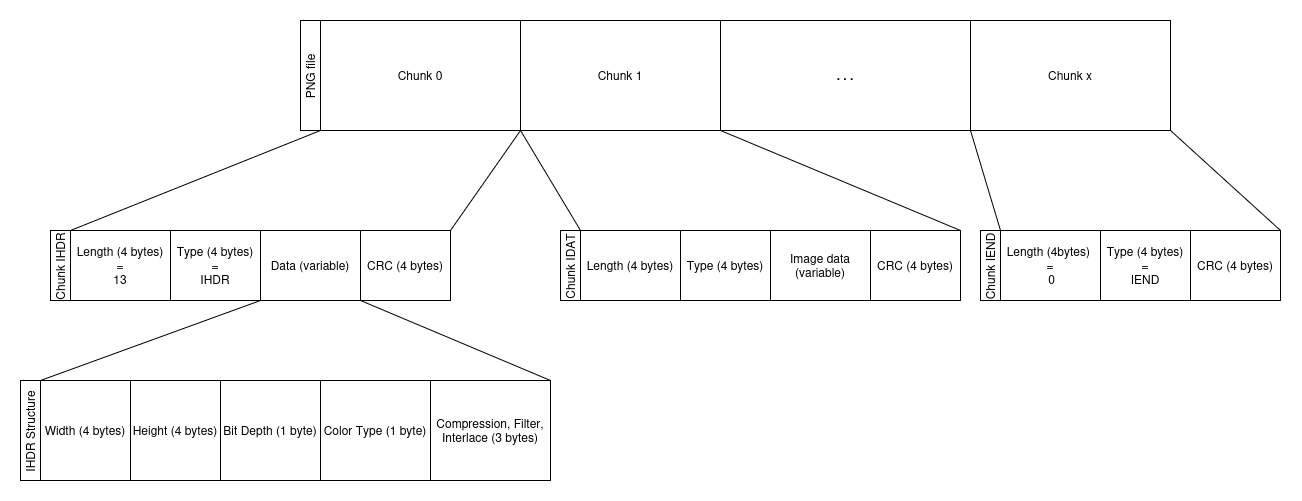
Chunk-based structure
PNGs consist of a series of chunks: header (IHDR), data (IDAT), and end (IEND), along with optional metadata chunks.
LSB Implementation on a PNG Image
How LSB Works
LSB (Least Significant Bit) steganography works by manipulating the smallest bit in the binary representation of a pixel’s color channel. In our example, the 8th bit in an 8-bit channel. Since this bit contributes only a tiny fraction (1/256) to the actual color value, modifying it has a negligible effect on the image’s appearance, making the change visually undetectable to the human eye.
Example
In this example, we take a pixel of value RGB (39, 41, 232) :
- 39 → 0010 0111
- 41 → 0011 1001
- 232 → 1110 1000
And now we encode the binary value 101 into it.
- 0010 0111 → 0010 0111 → 39 (this one didn’t change)
- 0011 1001 → 0011 1000 → 40 (instead of 41)
- 1110 1000 → 1110 1001 → 233 (instead of 232)
As you can (or cannot) see on the two following colors the difference is not clearly visible. Now imagine that this color change in only a single pixel. It is impossible to see this tiny difference on an image.
![]()
![]()
Python example
1. Embed string in image
We start by extracting binary from string:
|
|
We define a function to set LSB:
|
|
Then we embed the binary result of the string into an image:
Here we add the binary end marker 1111 1111 (0XFF) to know where to stop the
decoding.
Note
We use 1111 1111 as end marker because the value is beyond the maximum ASCII value so no character can have this value. It is useful to integrate this marker so the decoding knows when to stop to not parse the entire image, which takes a longer time.
|
|
We set R, G, B channels as a single list:
|
|
We modify the lsb of each pixel of each channel:
|
|
We reshape the channels and build the new image:
|
|
2. Retrieve string from image
We retrieve the string from the image:
We set R, G, B channels as a single list:
|
|
Then we extract the characters from the image channels
|
|
3. Showing results
Here is the image before and after encoding data in the image:


After reading this article, you can try to extract the message contained in the last image ;)
You can find the entire code on this my github repository: SteganograPy.
Storage Capacity
Each pixel in an RGB image provides 3 color channels, each of which can store 1 bit of hidden data using the LSB method. Therefore, every pixel contributes 3 bits to our total capacity. For instance, a 512×512 image has 262 144 pixels, which allows for 786 432 bits of embedded data. Since each character in a typical ASCII-encoded message uses 8 bits, this translates to about 98 304 characters of hidden text (it is approximately the length of The little Prince, by Antoine de Saint-Exupéry). That’s more than enough to conceal entire articles, emails, or even source code within a single image without any visible difference.
Possible enhancements
Encryption
One simple but effective enhancement is to encrypt the message before embedding it in the image. This adds a layer of security: if someone extracts the hidden data, they would still need the decryption key to make sense of it. This is a simple method to avoid trivial decoding by unwanted people.
Alpha channel
Some PNG images include an alpha channel for transparency, turning them from RGB to RGBA format. If available, the alpha channel can also be used to store 1 additional bit per pixel. In the same 512×512 example, using the alpha channel increases the total capacity by 32 768 characters.
Compression
Compressing the message before embedding is another practical enhancement. On large text or those with repetitive phrases, zlib compression can cut size by 30% to 60% or more.
Countermeasures
Steganalysis is the science of detecting hidden messages embedded within digital media. It employs a variety of techniques to uncover data that may be imperceptibly hidden. One of the primary methods is statistical analysis, which includes bit histograms to examine the distribution of least significant bits (LSBs) in the image data. These histograms can reveal unnatural patterns or uniformity. Another statistical method involves detecting noise irregularities. Since LSB substitution can introduce slight increases in randomness, these changes can sometimes be detected with the right tools.
Machine learning has also become a powerful ally in steganalysis. Convolutional Neural Networks (CNNs) and other deep learning models trained on large datasets can identify subtle artifacts and anomalies introduced by steganographic methods, even when such changes are invisible to human observers.
Signature analysis is another approach, where the suspect image is compared with an original (if available) to detect discrepancies. This can include inconsistencies in metadata or unusual increases in file size, which might indicate hidden payloads.
Conclusion
We have seen in this article how steganography could help hide and retrieve information through the PNG image format. By modifying the least significant bit of an image’s data, someone can embed enough information to carry an entire text.
We focused on LSB technique on PNG files but there are so many other file formats. We could have spoken about steganography in video files (each frame containing data) or in audio files (using phase or echo hiding techniques).
Nowadays, due to the increasing usages of AI, we found new ways to combine steganography and AI. You can read this article about AI-based image steganography. It uses techniques such as stego-SS scheme based on convolutionnal neural networks authentication.
Bibliography
- An Overview of Steganography for the Computer Forensics Examiner
- Hiding Information in Digital Images Using LSB Steganography Technique
- Analytical Study on LSB-Based Image Steganography Approach
- Python, AI for Steganography
- Pillow Documentation
- Matplotlib Documentation
- Comparison Of Steganographic Techniques of Spatial Domain and Frequency Domain in Digital Images
- StegExpose
- Herodotus (1987) [c. 430 BC]. The History. Translated by Gren, David. Chicago: University of Chicago Press. pp. 37–38.
- The bit level data interchange format
- Steganographic secret sharing via AI-generated photorealistic images