Introduction
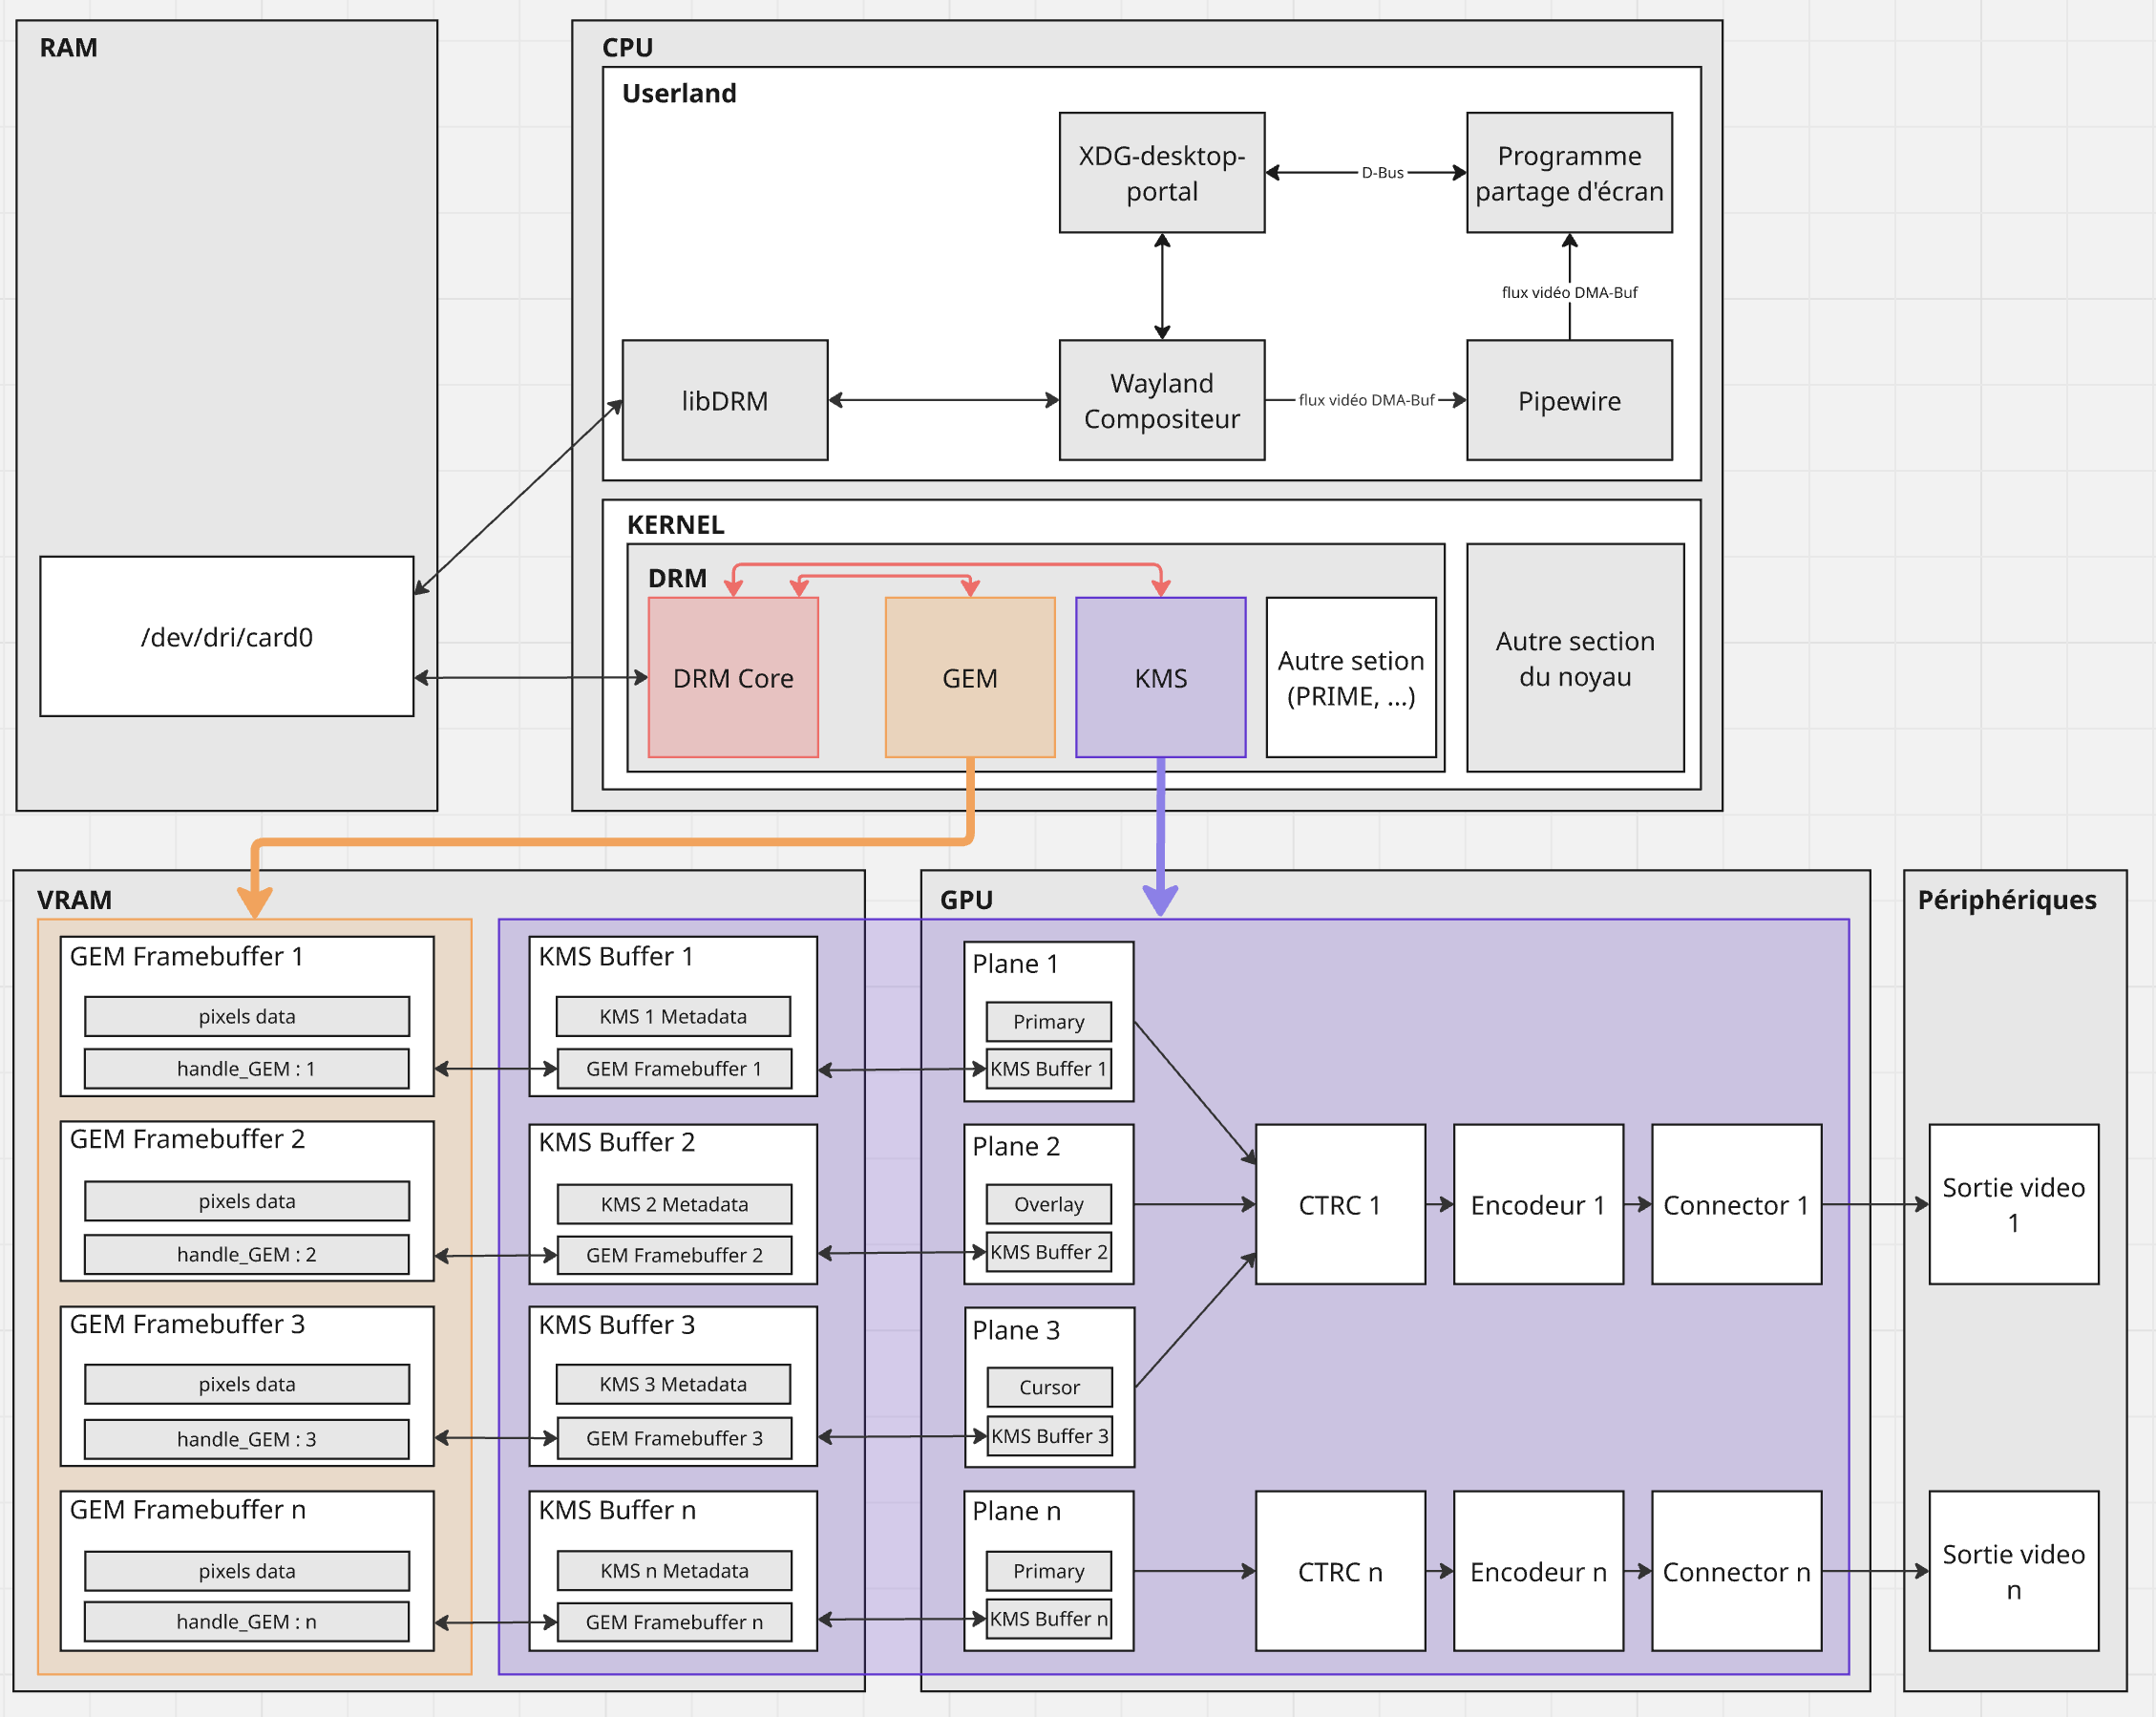
On Linux, graphical display is the result of close cooperation between the kernel, the GPU, and various user-space services.
This article offers a gradual exploration of these mechanisms, followed by a hands-on project: creating a minimal screenshot capture program.
We will go through the main software layers of the Linux graphics system: framebuffer, DRM (with GEM and KMS), graphics compositor, xdg-desktop-portal, and PipeWire.
This article will help you understand:
- What a framebuffer is and how the Linux kernel handles it;
- How images are actually rendered on your screen;
- How to capture a screen image securely;
It lays the technical foundations. We will code a simple version of a screen-sharing client, with a single screenshot sent to the server. Continuous capture could be covered in a second article.
Prerequisites
This article is intended for readers who already have some knowledge of computer science and system programming.
To follow the explanations and code examples smoothly, you should be familiar with:
- the basics of a Linux system;
- the difference between userland and kernel space;
- the fundamentals of the C language: pointers, structures, functions;
- the concept of RAM memory;
You don’t need any prior knowledge of DRM, KMS, PipeWire, or libportal. Everything will be explained step by step.
How are images stored and displayed on the screen?
Video memory refers to the specific part of memory dedicated to storing information to be displayed on screen. It is represented as a buffer called a framebuffer, stored in dynamic memory.
Framebuffer
A framebuffer is an allocated memory space used to store information meant to be displayed on screen. Each pixel is represented by 4 bytes (RGBA), and its size can be calculated using the following formula: size = width × height × 4 bytes.
With refresh rates ranging from 60 to 240 Hz and resolutions up to 4K, modern displays require fast calculations to continuously update the framebuffer, whi h necessitates a specialized graphics component.
Which component manages video memory?
To perform these calculations quickly, the computer uses a graphics card (GPU). This GPU may be integrated into the processor (iGPU) or external (dedicated GPU). The GPU is specifically designed for graphical computations.
Dedicated GPUs have their own memory, called VRAM (Video RAM), designed to offer high bandwidth and ultra-fast access, enabling better refresh performance.
When a dedicated GPU is used, the framebuffer is stored in its video memory (VRAM). If there is no GPU or VRAM, the framebuffer is stored in regular RAM, and the iGPU handles display rendering tasks
Video management in kernel space
We’ve seen that the framebuffer holds the pixels to be displayed. But how is this data actually sent to the screen ?
To understand that, several questions arise:
- Who manages framebuffers?
- How are framebuffers created?
- How is the framebuffer connected to the screen?
- How is the mouse cursor displayed?
Direct Rendering Manager (DRM)
DRM (Direct Rendering Manager) is a Linux kernel subsystem that handles graphical display management. It allows user-space applications to interact with graphics hardware in a secure and standardized way.
It handles framebuffer allocation, management, their association with a
physical display, and exposes them through interfaces like /dev/dri/card0.
DRM consists of three main components:
- DRM Core
- GEM (Graphics Execution Manager)
- KMS (Kernel Mode Setting)
DRM Core
The DRM core coordinates the interactions between GEM and KMS, and
ensures user-space interfacing via the /dev/dri/card0 device.
Graphics Execution Manager (GEM)
In reality, framebuffers are handled as GEM framebuffers — graphic buffers allocated and managed by the GEM manager.
GEM handles the CRUD operations for GEM framebuffers. Each GEM framebuffer contains:
- an ID (
gem_handle) - a buffer containing pixel data (the framebuffer)
Every visible element on screen (window, video, cursor…) relies on a distinct GEM framebuffer, visually assembled by KMS.
Kernel Mode Setting (KMS)
KMS is the part of the Linux kernel responsible for configuring the display and compositing the different graphical layers on screen. It combines images from multiple buffers (windows, videos, cursor…) and produces the final output sent to the screen.
To do this, KMS relies on several key concepts:
KMS Buffer
A KMS Buffer is a structure used by KMS to handle a framebuffer. It contains:
- a pointer to the framebuffer (managed by GEM);
- additional information such as size, pixel format, or memory location;
In other words, the KMS Buffer is a wrapper describing how to use a framebuffer within the display pipeline orchestrated by KMS
Plane
A Plane is an image layer that can be rendered on screen by the system. Each Plane is associated with a KMS Buffer containing the image to display, as well as a composition layer.
There are several types of layers depending on their function:
- Primary: the main layer (the background, typically the desktop);
- Overlay: an intermediate layer (e.g., a playing video);
- Cursor: the mouse cursor layer;
KMS can stack multiple Planes to construct the final image.
Simplified representation:
|
|
CRTC, Encoder & Connector
-
CRTC (Cathode Ray Tube Controller): combines the different Planes and generates the final image sent to the screen.
-
Encoder: converts the video signal generated by the CRTC into the required format (HDMI, DisplayPort, etc.)
-
Connector: corresponds to the physical port connected to the screen (HDMI, VGA, etc.)
To sum up:
- DRM core ensures interfacing between the kernel and user space;
- GEM manages framebuffers on the kernel side;
- KMS assembles these buffers to compose the final image sent to the screen;
Let’s now explore how to interact with DRM from userland for our screen sharing example.
Video management in userland
We’ve seen how the kernel handles display via DRM components. But to create a screen sharing program, understanding the kernel isn’t enough: we also need to know how to interact with video from user space, where our program is located.
Accessing the graphics system: /dev/dri/card0
/dev/dri/card0 is an interface exposed as a file descriptor (fd), which allows
communication between userland and DRM (kernel).
To send requests via this interface, we use the libDRM library, which provides low-level functions for interacting with DRM.
At first glance, it may seem that using libDRM directly is enough to access
screen content. But this ignores a key component of the system:
the graphics compositor, which also uses libDRM and /dev/dri/card0
to manage display.
Trying to connect directly to DRM alongside the compositor would cause a conflict. That’s why, in our case, we must go through the compositor.
Let’s now examine the graphics compositor and the role it plays in the display system and how our program can communicate with it.
The graphics compositor
The graphics compositor is the program that manages the visual interface: it draws windows, the cursor, and controls the system’s appearance. It also handles access to display, preventing any application from capturing the screen without permission.
Without it, there would be no mouse or windows — only a text terminal.
Every screenshot request needs to pass through the compositor. So it’s essential to consider it if we want to create our screen sharing program.
Linux systems mainly use two graphical architectures:
- X11: old protocol with centralized display management;
- Wayland (GNOME, KDE): newer, lighter, more secure and efficient. Wayland isolates applications from one another to prevent unauthorized display access.
We’ve seen how video streams are shared between the kernel (via DRM) and the graphics compositor, and the central role it plays in the entire display process.
Now let’s see how our screen sharing program can communicate with the compositor to access screen content.
Interaction with Video Memory
Before capturing the screen, our program must obtain permission from the compositor to read the video stream of our screen. Once the compositor grants access, it enables the application to subscribe to the stream and retrieve the data as memory buffers.
The next step is to understand which mechanism is used to make this access request.
Secure Screen Access: xdg-desktop-portal and PipeWire
On Wayland, an application cannot directly access the screen content. For security reasons, only the graphics compositor can grant or deny that access.
However, applications have no direct means of communication with the compositor. They must go through an intermediate interface: the xdg-desktop-portal graphical portal.
This portal acts as a secure intermediary: it sends the request to the compositor, displays a dialog box to the user, and then relays the response (permission granted or denied) back to the application. It thus allows an non-privileged application to request controlled access to the screen, with the user’s explicit consent.
This portal consists of three parts:
- Frontend: exposed to our application, it provides simple methods to call;
- Daemon: links the frontend to the backend and manages coordination;
- Backend: communicates with the compositor in our case;
How Screenshot Capture Works
Screenshot capture via xdg-desktop-portal happens in three steps:
CreateSession: a session can be seen as a request and its tracking context;SelectSources: the user chooses what to share (full screen, a window, etc);Start: the portal approves the request, then the compositor creates the video stream via PipeWire;
Once the session is started, the portal returns two values:
- a file descriptor (fd), which is a Unix socket allowing our application to connect to the PipeWire server;
- a node ID, which is a unique identifier of the video stream, used to subscribe to the correct stream (the one just created);
PipeWire: Handling the Video Stream
PipeWire is a multimedia server designed to carry audio and video streams (such as sound, webcam, or screen) with very low latency.
In our case, PipeWire transmits the screen content from the compositor to our application. Thanks to the file descriptor and node ID provided by the portal, our program can connect to the correct stream and receive the screen frames as memory buffers.
In summary: xdg-desktop-portal is used to make a secure request to the compositor to access the screen, with the user’s explicit consent. Once that request is accepted, PipeWire takes over and sets up the video stream, allowing the compositor to send the screen images to the application.
Simplifying Technologies
As we’ve seen, setting up a screenshot capture with xdg-desktop-portal and PipeWire can seem complex. Fortunately, there are libraries that simplify this interaction.
libportal
libportal is a C library that provides a simple interface to use xdg-desktop-portal. It hides all the complex steps (session creation, source selection, response handling…) behind a simple API.
Now that we understand the whole mechanism — from video memory to the compositor, via the portal and PipeWire —, let’s now move on to the practical part: implementing a first version of our screen sharing program.
Getting Started with a Screen Sharing Application
In this section, we’ll implement a first minimal version of a screen sharing program.
Technical Overview
Here are the main steps of how our application works:
- The client uses
libportalto capture a screenshot; - It converts the PNG image to raw pixel data (RGBA);
- It sends this data over UDP to a server;
- The server receives and reconstructs the image in a simple format (PPM).
To simplify the implementation, we will use:
libportal: to easily access the xdg-desktop-portal;GLib/GIO: required forlibportalto work; it provides the asynchronous event loop and is the foundation of GNOME applications;GdkPixbuf: to convert the PNG image into raw format;
Network performance is optimized using UDP and IO_uring, which are already implemented in the project. However, we will not go into detail here to stay focused on the overall logic.
Implementation: client-side capture
Let’s begin by writing a capture_screenshot() function in C, which captures
the screen and retrieves the image in PNG format.
We’ll use the following libportal functions:
xdp_portal_new(): creates an XDG portal instance;xdp_portal_take_screenshot(): starts an asynchronous screenshot capture;xdp_portal_take_screenshot_finish(): completes the capture and returns the resulting PNG;XDP_PORTAL(): used to cast to the right type;
We’ll also rely on the GLib event loop to hold execution until the asynchronous callback completes
Let’s first define a structure to store all the information we’ll need:
|
|
The next step is to implement our capture_screenshot() function:
|
|
Then the on_screenshot_ready() callback:
|
|
What’s next?
Once the capture is done, the PNG image is converted to raw format
(RGBA pixel array), then sent over UDP.
On the server side, the data is received and written to a .ppm file for
display.
The full code (client and server) is available on a GitHub repo linked to the article :
Conclusion
In this article, we explored how video memory works on Linux — starting from framebuffer to screen display through the DRM subsystem. We also looked at how modern compositors handle both display and security management, and how an application can request a screenshot via xdg-desktop-portal and PipeWire.
By relying on xdg-desktop-portal and PipeWire, we implemented a secure method for capturing the screen from an non-privileged application. Finally, we began building a minimal screen sharing program, based on a single screenshot.
Here is an example of the output generated by our application.
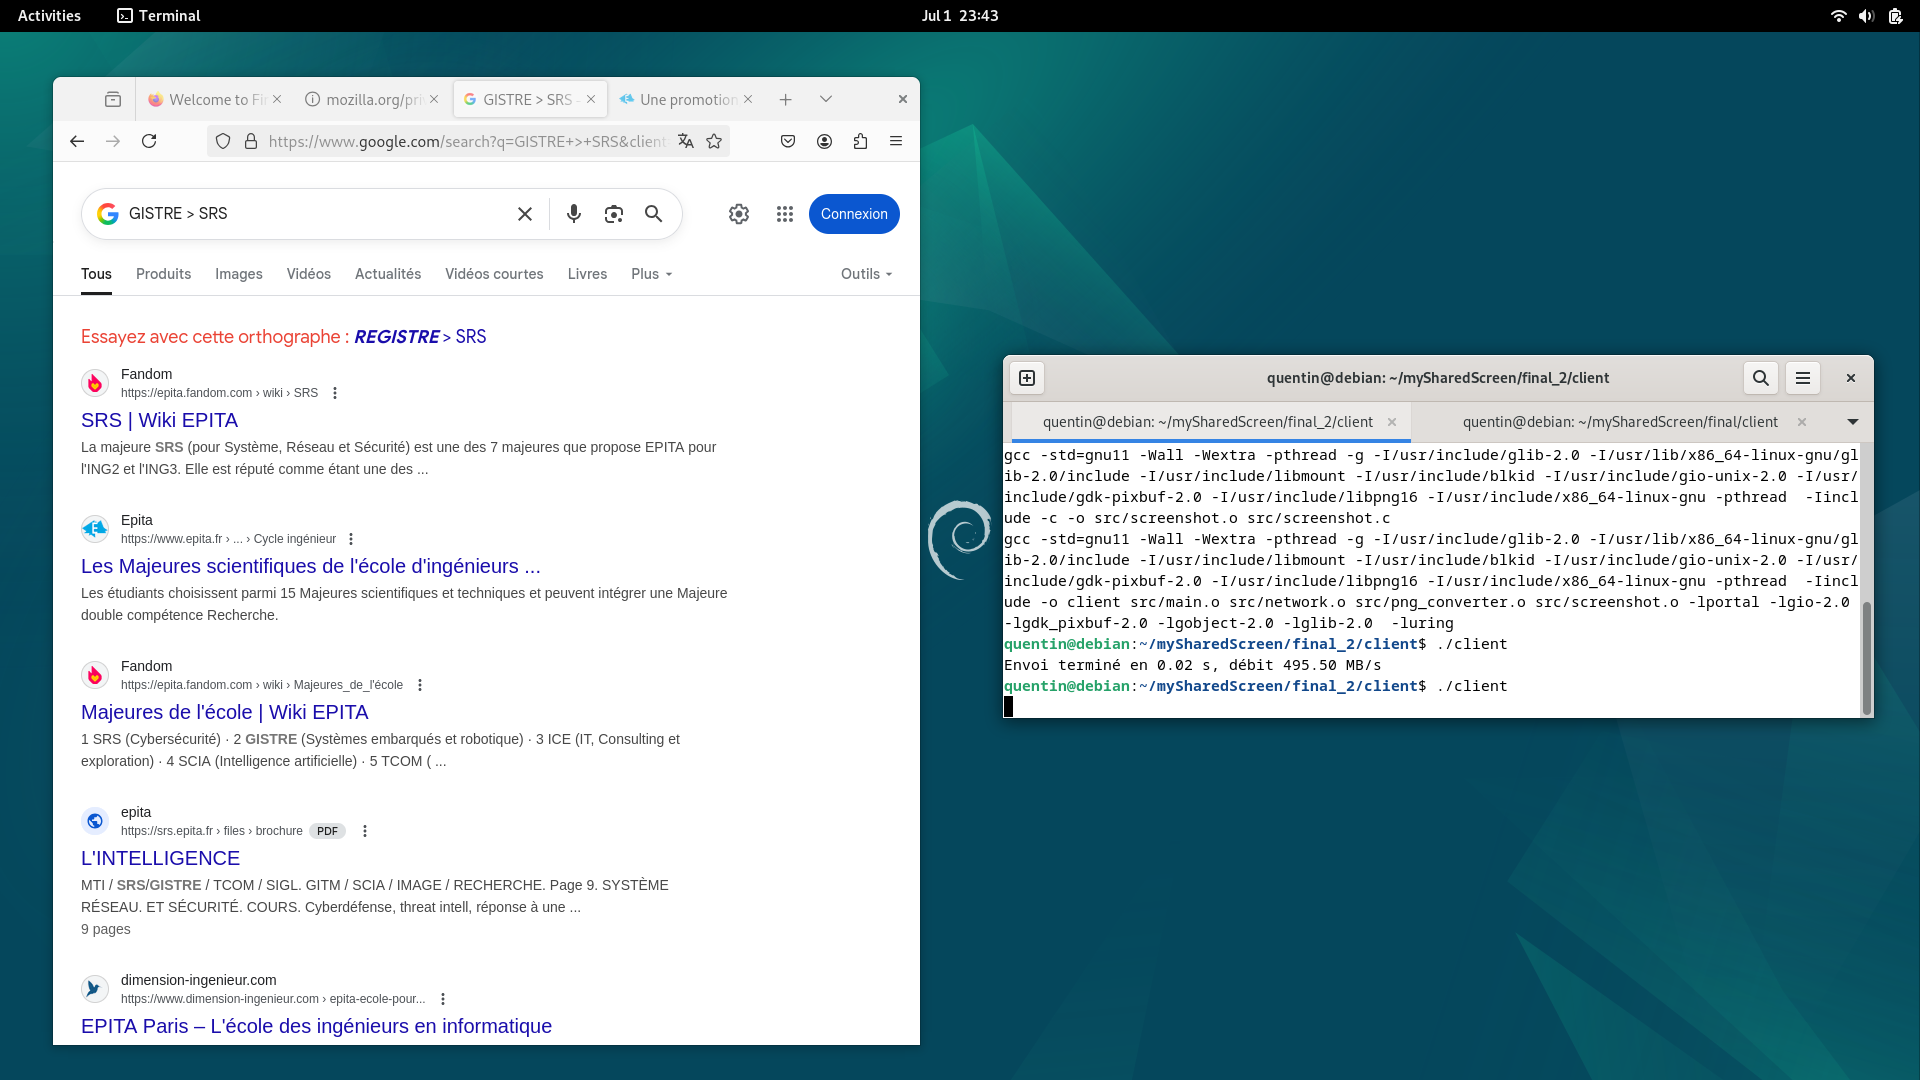
This minimal screen sharing feature is only a starting point: perhaps in a future article, we’ll explore how to handle a continuous video stream.
References
https://dri.freedesktop.org/docs/drm/ https://gitlab.freedesktop.org/mesa/drm https://flatpak.github.io/xdg-desktop-portal/ https://pipewire.org/ https://www.kernel.org/doc/html/latest/gpu/drm-kms.html https://docs.flatpak.org/libportal/t https://wayland.freedesktop.org/architecture.html https://docs.flatpak.org/en/latest/portals.html https://gitlab.freedesktop.org/pipewire/pipewire/-/wikis/Screen-Capture https://gitlab.freedesktop.org/pipewire/pipewire/-/wikis/home https://developer.gnome.org/gdk-pixbuf/stable/ https://docs.gtk.org/glib/ https://drewdevault.com/2018/07/29/KMS-DRM-tutorial.html