In the embedded world, there are many microcontrollers that are not well known. ARM Cortex-M is the most popular microcontroller in the world, but there are many other microcontrollers that are used in various applications. Maybe you have heard of Atmel AVR, Microchip PIC or Texas Instruments MSP430. They all follow the same basic architecture: a CPU, a memory, some RAM and a set of I/O. They are all very similar, but they have different feature set and capabilities.
There are also many other microcontrollers that are lesser known: One of them is the Parallax Propeller P8X32A.
What distinguishes it from other microcontrollers ? It is a low power multi-core microcontroller, which means that it has multiple cores that runs in parallel. The first version of the Propeller contains eight 32 bits cores with a custom ISA.
Each core, called “cog”, has its own memory, has access to two hardware counters and generators which can be used to generate video signals or PWM signals.
Instead of relying on C or C++, the Parallax recommends to use their own programming language called Spin. Spin is a high-level language that is compiled to a bytecode executed by an interpreter loaded into the Propeller memory. The interpreter is written in PASM, a low-level assembly language that is used to program the Propeller. If you want to use C, you can use the Propeller-GCC compiler that is a GCC port or Catalina to build C programs for the Propeller.
Sadly, the Propeller 1 is deprecated but still available. The Propeller 2 is the current version of the Propeller: it’s an expanded and faster version of the Propeller 1 with more memory, I/O and a modified ISA.
In this post, I’ll see how to use the spinsim simulator to run some simple programs on a virtual Parallax Propeller 1.
The Propeller P8X32A architecture
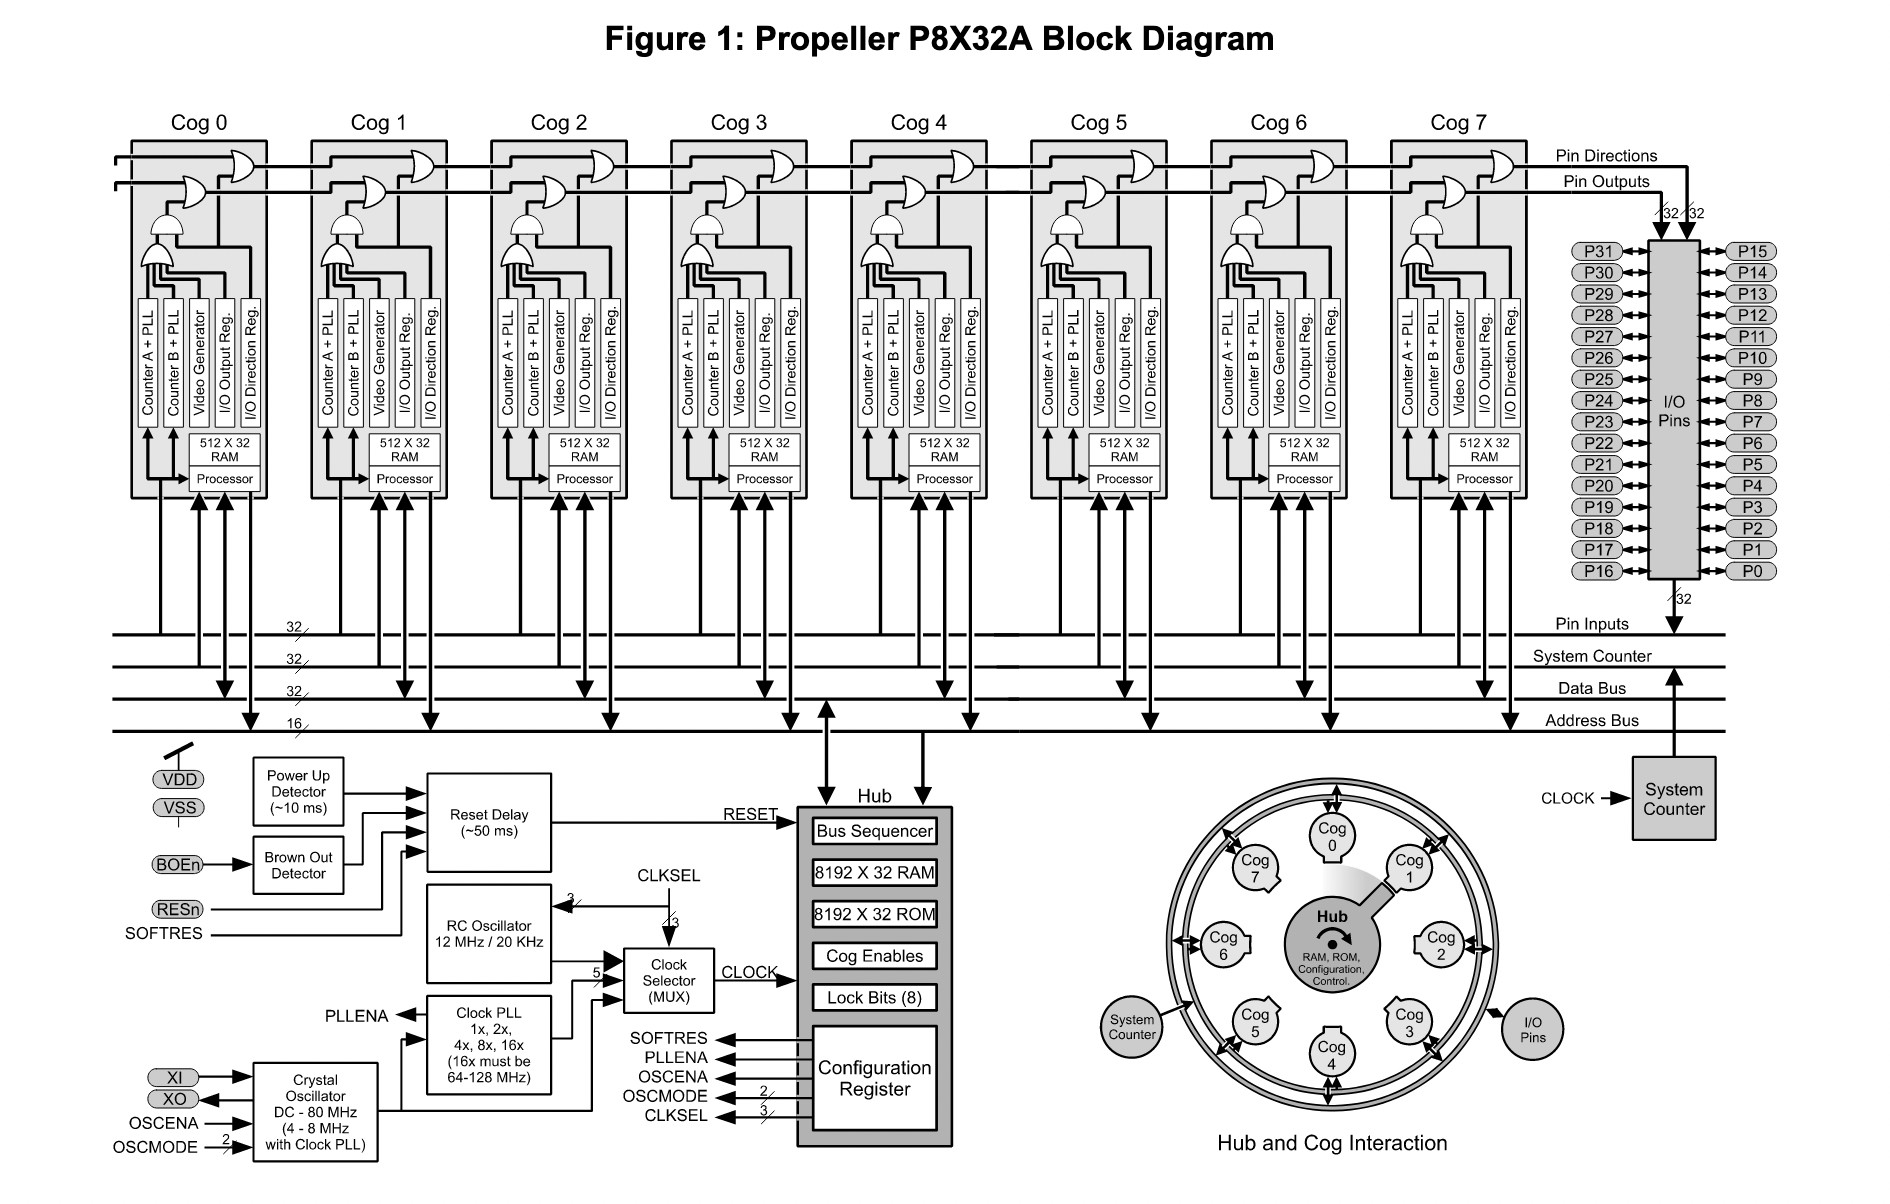
The first version of the Propeller is a 32-bit microcontroller released in 2006, featuring 8 symmetric cores called “cogs” which are numbered from 0 to 7. Each cog has its own local memory of 2 KB of RAM called “Cog RAM” and is able to reach up to 80Mhz (20 MIPS).
The Propeller does not have a cache, a MMU or a FPU. To compensate for the lack of FPU, the Propeller has a set of LUTs (Look-Up Table) that can be used to perform Sinus, Logarithm and anti-logarithm operations. Using the provided LUTs, it’s possible to compute other mathematical functions such as cosine.
A “cog” has access to two counters which can monitor or control two I/O pins. Interestingly, the cogs have access to a PLL (Phase-Locked Loop) that can be used to generate different frequencies from the main clock up to 128Mhz. Using the PLL, the cogs can generate video signals or PWM signals. When combined with the counters, it is possible to synthesize signals other than PWM, such as a DAC. Every cog has a configurable video output that can be used to generate RGB (such as VGA) or composite video signals.
No interrupts are available, counters are used to monitor I/O pins, which can be used to simulate interrupts. The Propeller 1 has 32 I/O pins, but only 28 are available after booting. The remaining 4 pins are used for the boot process. To avoid conflicts, the Propeller 1 features eight locks that can be used to protect I/O pins, acting as a bit mutex.
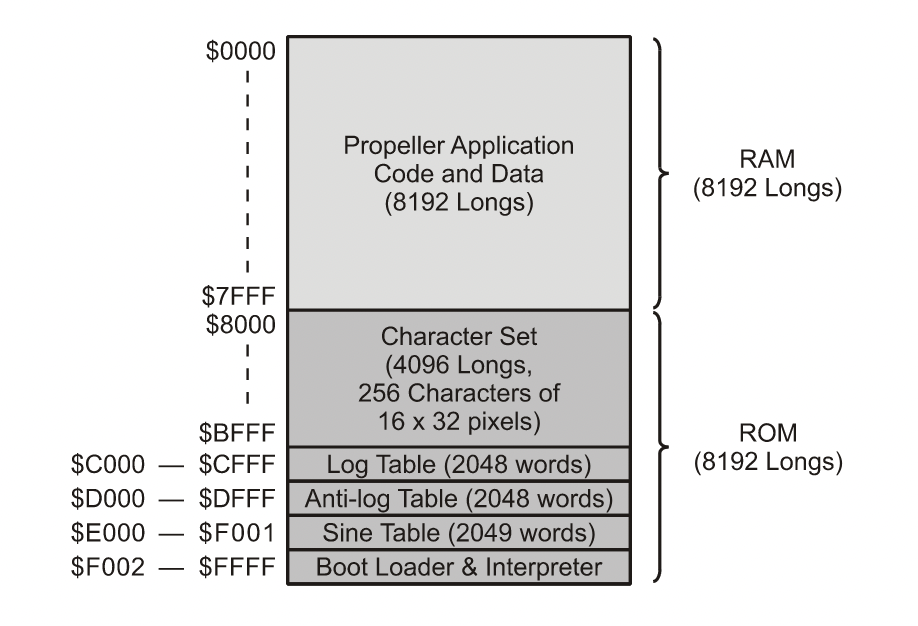
The main memory of the Propeller is called “Main RAM” and is shared by all the cogs, it is 32 KB of RAM. Only one cog can access the Main RAM at a time, the other cogs must wait for the memory to be available to access it. The RAM is splited into 6 differents parts:
- 0x0000-0x7FFF: The main memory
- 0x8000-0xBFFF: Caracter set, can used to display text on a external display
- 0xC000-0xCFFF: The cog memory
To access the Main RAM, the cogs must wait for the memory to be made available by the “hub”. The hub is the main cog that is responsible for managing the main memory using round-robin scheduling from cog 0 to cog 7. If a cog wants to access the main memory, it must wait up to 16 clock cycles for the hub to release the memory for the cog.
Experimenting with Spin
The Propeller is a very interesting microcontroller, but it is not very popular. It is not easy to find a lot of information about it outside the Parallax website.
In France, development boards aren’t widely available. As a result, I decided to experiment with the official Propeller Simulator spinsim using the OpenSpin compiler. Using the simulator, we can run some simple programs on a virtual Propeller 1. The simulator is available for Linux, Windows, and macOS. It does not support every Propeller 1 and 2 instruction, but it is still very useful for learning how to use the Propeller. It features an implementation of the Spin virtual machine which can be used to run Spin programs.
Installing the Propeller Simulator and the OpenSpin compiler
The first thing to do is to install and build the OpenSpin compiler. It is available on GitHub. Assuming that you’re on a Ubuntu based distribution, you can install the dependencies with the following command:
|
|
Then, you can clone the repository and build the compiler:
|
|
The compiler should be now available in the build directory.
You can now install the Propeller Simulator, also available on GitHub. The build process is similar to the one of the Spin compiler:
|
|
The spinsim binary would be also available in the build directory.
After building the compiler and the simulator, you should copy the spinsim and
conio.spin from the build directory of spinsim to a new directory that will
contain your programs. You can also copy the openspin binary from the
OpenSpin directory to this directory.
The conio.spin file contains some Spin functions that are used to print text
on the simulated terminal. It is not necessary to use it, but it is very useful
to test your programs on the simulator. In the spinsim directory, you can
also fin a fileio.spin file that contains some functions to read and write
files.
You should now have a directory that contains the following files:
|
|
Short introduction to Spin
In this section, I’ll give a short introduction to the Spin language. Spin is a high-level language that is compiled to a bytecode that is executed by a virtual machine. The virtual machine is loaded into the Propeller memory using self-modifying code.
Spin is a very simple language: It is similar to Basic and Python. We’re going to focus on the version 1.0 of Spin. The version 2.0 is an extended version of Spin that adds some new features and instructions but runs only on the Propeller 2 MCU family.
A Spin program is composed of multiple blocks. Each block has different
properties. Like Python, the instructions inside blocks are indented.
Comments are written using the ' character for a single line comment or
{{ }} for a multiline comment.
There are six types of blocks:
- PUB: Public Function definition
- CON: Constant definition
- DAT: Data definition which can be modified by the program at runtime
- PRI: Private Function definition
- OBJ: Object definition
PUB/PRI block
The first common block is the PUB block. It is a function block
that can be called from other blocks. The first PUB block is the entry point
of the program.
The PUB block is composed of a name and a list of parameters:
PUB Name(param1, param2) | Variable1, Variable2, Variable3
  ' Instructions here
  abort
In this example, the Name function has two parameters: param1 and param2.
After the | character, we can declare some local variables that will be used
in the function. The variables are separated by a comma. The abort instruction
is used to stop the running cog which execute the function.
PRI is similar to the PUB block, the Spin language has basic support for
object-oriented programming. The PRI block is used to define private functions
that can only be called from the source file that contains the function.
CON block
Another block is the CON block. It is used to declare constants. The constants
a declared using the = operator:
CON
  constant = 42
  constant2 = 44
You can also declare the constant on one line:
CON
  constant = 42, constant2 = 44
It’s possible to use algebraic expressions in the constant declaration:
CON
  constant = 42 + 2 ' Same as 44
DAT block
The DAT block is used to declare global variables that can be modified by the
program at runtime. The variables are declared using the = operator:
DAT
  byte variable = 42
  word variable2 = 44
  long variable3 = 45
  byte stack[3]
OBJ block
The OBJ block is used to declare objects. An object is a data structure that
OBJ
  PWM[2] : "PWM"

PUB GenPWM
  PWM[0].Start
  PWM[1].Start
We can see that two PWM objects are declared. The first object is accessible
using the PWM[0] expression and the second one using the PWM[1] expression.
The public function GenPWM starts both PWM objects.
In this blog post, I will not go too much in detail about the Spin language. I will only use the basic features of the language, as this post is oriented towards experienced developers that want to experiment with the Propeller.
For more information about the Spin language, you can read the Spin Reference.
Your first program
First, let’s check that the simulator is working and that we can run a simple
program. Create a new file named infinite.spin and add the following code:
PUB Main
  Repeat
This simple program is a Spin program that does nothing: it just loops forever.
To compile the program, we can use the openspin compiler. If you’re in the
directory that contains the openspin binary, you can compile the program
with the following command:
$ ./openspin test/infinite.spin -v -o infinite.bin
Propeller Spin/PASM Compiler 'OpenSpin' (c)2012-2018 Parallax Inc. DBA Parallax
Semiconductor.
Version 1.00.81 Compiled on Oct 25 2022 18:30:28
Compiling...
test/infinite.spin
Done.
Program size is 28 bytes
You can see that the compiler has generated a infinite.bin file that contains
the bytecode of the program. The bytecode is a binary file that can be loaded
into the Propeller memory. By default, the Cog 0 would be used to execute the
program. To run the program, we can use the spinsim simulator:
|
|
The -p option is used to load the Propeller the Spin virtual machine into the
Propeller memory. If we omit this option, the simulator would only load the
program into the Propeller memory but wouldn’t use the Spin virtual machine.
It would run the program as a normal binary file and would cause undefined
behavior.
More advanced program
The spinsim simulator has a serial emulation that can be used to communicate
with the host computer. The serial is emulated using the standard input and
output of a terminal and are mapped into the 31st and 32nd pins of the
Propeller at the 115200 bauds by default.
The conio.spin file contains some functions that can be used to print text
and to read characters from the serial port within the Spin program. For the
examples, I will make a copy of the conio.spin file in the current directory
and rename it to the file that contains the Spin program. This is not necessary
and you can add the conio.spin file to the openspin command line using the
-I option to add the conio.spin file to the include path.
There is a simple program that can be used to test the serial port. Create a
new file named serial.spin and add the following code:
PUB Main
  start(31, 32, 0, 115200)
  str(string("Hello World!"))
Remember that the first PUB block is the entry point of the program!
In this example, the Main function starts the serial port and prints the
string Hello World! on the serial port. str is a function defined on the
conio.spin file that prints a string on the serial port. string is a
builtin function that creates a string from a C string and returns a pointer.
The start function is used to start the serial port. It takes four parameters:
- The pin number of the RX pin (31 in this example),
- The pin number of the TX pin (32 in this example),
- Some options that alter the behavior of the serial port,
- The baudrate.
Now we can compile the program and run it using the openspin compiler:
$ ./openspin serial.spin -o serial.bin
You can then run the program using the spinsim simulator:
$ ./spinsim -p serial.bin
Hello World!
The programs use only the first Cog of the Propeller. We could use the other Cogs to execute other functions in parallel.
Create a new file named multicog.spin and add the following code:
VAR
  Long CogTwoStack[6]                     ' Stack for the Cog

PUB Main | X                              ' X is a local variable
  start(31, 32, 0, 115200)                ' Start the simulated serial port
  X := 1                                  ' Initialize X at one
  coginit(2, Increment(@X), @CogTwoStack) ' Start the 2nd cog to increment X
  repeat until X < 64                     ' Check until X > 32
  str(string("X is 64, stopping program"))' Print the string
  cogstop(2)                              ' Stop the cog

' This cog increments the value of X
PUB Increment(XAddr)
  repeat                                  ' Repeat the following endlessly
    long[XAddr] += 1                      ' Increment the value of X by one
Now, it get more interesting. Next to the Main function, we declare a local
variable X that is used to store the value of the variable X in the Main
function. We set the value of X to 1 and start the Increment function in
the 2nd Cog. The Increment function takes a pointer to the variable X as
parameter. @ is used to get the address of a variable, similar to the &
operator in C. repeat is a Spin keyword that is used to create an infinite
loop. long[XAddr] += 1 is used to increment the value of the variable X.
A Cog is a thread of execution. It is possible to start multiple Cogs to
execute multiple functions in parallel. The coginit function is used to start
a Cog. It takes three parameters:
- The id of the Cog to start,
- A function to execute in the Cog,
- A pointer to the stack of the Cog (required for multiple function calls)
Compiling and running the program would give the following output:
$ ./openspin multicog.spin -o multicog.bin
[...]
$ ./spinsim -p multicog.bin
X is 64, stopping program
You have made your first program that uses another Cog!
What if we want to use multiple Cog in parallel? We’re not limited by the number
of Cogs and we can spawn tasks on a new Cog dynamically. The cognew function
is used to start a new Cog dynamically. It takes two parameters:
- A function to execute in the Cog,
- A pointer to the stack of the Cog (required for multiple function calls again) The function returns the id of the Cog that was started, which can be used to stop the Cog later if needed.
Again create a new file named multicog2.spin like before and add the following
code:
VAR
  Long CogTwoStack[6]                         ' Stack for the Cog 2
  Long CogThreeStack[6]                       ' Stack for the Cog 3
  byte CogTwoID
  byte CogThreeID

PUB Main | X, Y                               ' X is a local variable
  X := 0
  Y := 0
  start(31, 32, SYS_CON_PUTCH, 115200)        ' Start the simulated serial port
  CogTwoID := cognew(PrintCogTwo(@X), @CogTwoStack)
  CogThreeID := cognew(PrintCogThree(@Y), @CogThreeStack)
  repeat until X > 8
  cogstop(CogTwoID)                           ' Stop the cog 2
  cogstop(CogThreeID)                         ' Stop the cog 3
  str(string("stopping program: - X: "))
  dec(X)
  str(string(" Y: "))
  dec(Y)
  repeat                                      ' Infinite loop

' This cog increments the value of X
PUB PrintCogTwo(XAddr)
  repeat
    long[xAddr] := long[xAddr] + 2
    waitcnt(clkfreq + cnt)

' This cog increments the value of Y but slower
PUB PrintCogThree(YAddr)
  repeat
    long[yAddr] := long[yAddr] + 1
The PrintCogTwo and PrintCogThree functions are similar to the Increment
function in the previous example. The PrintCogTwo function increments the
value of X by two then wait for one second using the waitcnt function. The
PrintCogThree function increments the value of Y by one as fast as possible.
The Main function starts the PrintCogTwo and PrintCogThree functions in
two new Cogs. It then waits until X is greater than 8 and stops the two Cogs.
Then it prints the value of X and Y and enters an infinite loop.
Compiling and running the program would give the following output:
$ ./spinsim -p multicog2.bin
stopping program: - X: 10 Y: 37494
Why is the value of X is 10 and not 9? The Main function is executed in the
1st Cog, PrintCogTwo is executed in the 2nd Cog and PrintCogThree is
executed in the 3rd Cog. We don’t know if the cogstop function will stop the
Cog before it could increment the value of X. Thus, the value of X is 10.
Y may be incremented by the PrintCogThree, but no comparison is made to
check the value of Y. Without any memory lock, the PrintCogThree function is
executed faster than the PrintCogTwo function.
We could go further and make more complex programs. But this is enough to get started with Spin.
Beyond the basics
With all the basics covered, you can now start to experiment with the Propeller. You can find a lot of examples on the Parallax website, especially the Parallax Forum.
What about C compilers ?
Even if the Spin language is very powerful, it’s a domain-specific language. Some developers prefer to use a C compiler to write their programs. Although there are some disadvantages, such as program size and features, it’s possible to use a C compiler to write programs for the Propeller 1/2.
The Parallax website provides a C compiler for the Propeller 1/2. It’s called
propeller-gcc. It’s a fork of an old GCC compiler that has been modified to
generate code for the Propeller. Even if the propeller-gcc compiler is not
actively maintained, it’s still possible to use it to write programs for the
Propeller.
There is also community effort to create a new C compiler for the Propeller:
- Catalina: Based on the LLC compiler
- p2LLVM: Based on the LLVM compiler, only supports the Propeller 2
- riscvp2: Run a RISC-V instruction set simulator on the Propeller 2
As the post is already quite long, I will not go into details about the C compilers and how to use them.
Conclusion
We have seen how to use the Propeller Simulator to experiment with the Propeller microcontroller. The Propeller is a very interesting microcontroller that uses “cogs” to run multiple programs in parallel. Using the Spin programming language, it is possible to write programs that can run on the Propeller without diving into the low-level details of the Propeller.