Since its first official release in 2015, Rust has proven to be a mature and complete language which can leverage many features to ensure program’s safety while still being remarkably user-friendly and performant. This degree of satisfaction is particularly obvious since the Rust community (the self-proclaimed Rustaceans) will joyfully answer you “Just rewrite it in Rust!” if you dare to ask them an opinion about a tool written with anything else.
Let’s see how the Rust language features like the borrow checker can make embedded programming much safer and pleasant.
Outline
In this article, we will discuss the reasons and features that make Rust a credible alternative to C/C++ in embedded development. Then, we will make an overview of the Embedded Rust landscape: How are the contributors organized to develop standards, and how these standards are implemented through device-specific HALs (Hardware Abstraction Layers). Finally, a small example of toolchain setup and “Blinky”-like program will be presented.
It is assumed that the reader has a basic knowledge of embedded programming and Rust language. If you have no prior experience in Rust, you might want to take a look at the rustlings exercises to learn the basics before coming back to this article.
Rust advantages for embedded programming
This section presents the advantages of the Rust ecosystem regarding embedded programming (though theses advantages may not be exclusive to embedded programming).
Tooling ecosystem
When it comes to tooling ecosystem, Rust makes it simple: cargo.
cargo wears many hats: it is a build system, a package manager, and a dependency manager at the same time.
It is unrivaled in its domain: all Rust packages have it in common.
It’s an advantage, because when using 3 external librairies in your project, you don’t need to interface 3 different build systems, one being Meson, the other being CMake and the last one being an absolutely atrocious mix of Makefiles and shell scripts which wasn’t built even once in the last two decades1.
It’s just cargo.
cargo can be extended with subcommands, like cargo-flash which we will encounter in the tutorial section.
Also, it is permissive enough to let us define the target platform of the binary, like an AVR or ESP32 MCU. We’ll cover this in the tutorial section as well.
Portability
Rust is portable to many architectures.
It has obviously first class support for x86 architectures, but the toolchains also allow to compiles programs to more exotic architectures.
Among others, it does support the AVR archs, which is useful for programming on Arduino, and thumbv7em-none-eabi, which is the architecture we will use later in the tutorial to program a STM32 device.
You will find a link to the list of all supported architectures in the Going Further section.
Explicit memory safety
Indeed, Rust provides tools that greatly help programmers in constrained environments. When using Rust, the borrow checker, ownership and lifetime engine incorporated in the compiler offers a warranty of memory soundness that is unmatched by the more permissive C/C++. Feel free to consult the resources mentioned in the Going Further to learn (or remember) about these compiler mechanics.
Furthermore, the strictness of these features also help to make the memory management explicit. When passing arguments to functions we can either use:
&for referencing the data;.clone()or similar to copy it;- nothing to move it
In the following example, the C++ function call cannot tell us whether the string was moved, copied or referenced, whereas Rust makes it explicit and we need to use an ampersand &.
|
|
|
|
This is particularly useful when working on constrained environments, where copying a string unwillingly can have a serious impact on performances.
Rust type and traits feature
The Rust traits are roughly similar to what we call “interfaces” in object oriented programming.
In short, a trait defines a specific behavior on a given type.
Combined to the expressiveness of the Rust type system, traits are used in embedded programming to describe the capabilities of the hardware.
For example, the embedded HAL we will discuss in the next sections defines Pin types, on which the Input, Output, PwmOutput, or AnalogInput traits can be implemented, depending on the actual capabilities the pin on the target MCU.
In the example below (from the arduino-hal), The Pin struct links a physical pin (PinOps) and an Io mode which describes its capabilities.
|
|
Honorable mentions
Here are some other benefits to using Rust we won’t be discussing further:
- The
#[no_std]macro. It allows us to opt out from including the Rust standard library to the produced binary, which is OS dependent. - The convenient features integrated in the runtime:
Option,Result, iterators… - The zero-cost abstraction principle. That is: “you don’t pay for anything you don’t use, and what you do use, you cannot code it any better”. It means that all the “high-level” paradigms implemented (such as iterators) will cost the smallest possible runtime overhead.
The Rust embeddedization effort
Rust embedded working group
Rust is a low-level language designed with system use in mind (as its integration in the 6.1 Linux kernel can emphasize), so it’s not surprising it caught the attention of the embedded programmers.
As so, they have regrouped to create the Rust on Embedded Devices Working Group (or REDWG, but nobody calls them that). This is an official working group attached to the Rust Foundation. As stated in their README, the working group “focuses on improving the end-to-end experience of using Rust in resource-constrained environments and non-traditional platforms”.
They are responsible for maintaining a lot of things, but we will only be focusing on one: the embedded-hal.
The embedded-hal repo defines the core features of HAL.
That is, common interfaces, such as I2C, SPI, PWM, or Serial.
For example, the SpiDevice trait defines read and write functions, based on a transaction function that should be implemented by the implementation crate (n.b: A crate is a library in the Rust ecosystem).
The advantage of using this master HAL is that any code written using only its interfaces will be completely platform agnostic, and thus shall be reusable with any device directly.
The embedded-hal repository also features some variants crates for async and and non-blocking IO support, which can prove handy, but which are the same in essence.
HAL implementations
The embedded-hal crate is very useful, but not by itself.
Indeed, one needs the HAL interfaces to be implemented in order to take advantage of them when programming a device.
These numerous implementations (sometimes called HAL drivers), are device dependent and provide all the low-level logic.
Most HAL implementations are referenced on the crates.io website with the tag embedded-hal.
Usually, the HAL crate will depend on a Peripheral Access Crate (PAC). The PAC is a crate which provides a low-level access to the microcontroller’s hardware. It is most often generated from SVD description files which are a file format used to describe the programmer’s view to the device, and which are provided by the chip manufacturers.
In a simple way, the HAL is merely an implementation of the traits defined in embedded-hal on the hardware provided by the PAC.
Most HALs are more sophisticated, though, and can implement some device-specific feature. (e.g: the stm32f4xx-hal crate also gives access to the devices’ timers).
The following diagram briefly summarizes the relation of these bricks.
                    ┌──────────┐
                    │ SVD file │
                    └─────▲────┘
┌──────────────┐          │
│ embedded-hal │          │ Generated from
└──────▲───────┘          │
       │             ┌────┴────┐
       │             │ MCU PAC │
       │ Implement   └────┬────┘
       │ interfaces       │
       │                  │ Provide HW access
       │    ┌─────────┐   │
       └────┤ MCU HAL ◄───┘
            └─────────┘
Note: The PAC and HAL are often included in the same crate.
In the next section, we illustrate all these boring explanations with practice: A tutorial on how to get started with Rust to program an STM32 !
Tutorial : Programming an STM32 with Rust
This tutorial does not explain how to install the base Rust toolchain, as there are already good existing tutorials, like this Rust installation tutorial on Ubuntu.
From here, I assume you have rustup, cargo and rustc installed on your machine, working as they should.
The card we will be using is a Nucleo-64 STM32F401RE.
Step 1: Installing the environment
The first step is to create the development environment we will need.
Start by creating a new Rust project using cargo.
cargo init stm32_blink
cd stm32_blink
Then, we need to indicate to Rust that we are not compiling code for the native x86_64 machine we are currently running on, but rather for an ARM Cortex MCU, so we have to install a specific target. Depending on the target MCU, we might need a different toolchain:
thumbv6m-none-eabi, for the Cortex-M0 and Cortex-M1 processorsthumbv7m-none-eabi, for the Cortex-M3 processorthumbv7em-none-eabi, for the Cortex-M4 and Cortex-M7 processorsthumbv7em-none-eabihf, for the Cortex-M4F and Cortex-M7F processors
Our device is based on a Cortex-M4, we will use the thumbv7em-none-eabi toolchain.
Proceed as follows to install the toolchain via rustup.
rustup target add thumbv7em-none-eabi
By now, we can run cargo build --target=thumbv7em-none-eabi, which will result in an error saying “Can’t find crate for ‘std’”.
This is expected, as we do not have access to the Rust stdlib when building microcontrollers, and the default program generated by cargo init is a simple Hello World printing on STDOUT.
In order for it to compile, we need to give a bit more details to cargo.
First, we need to add the dependencies we will need in the Cargo.toml file, as well as optimization parameters to make sure the final binary is the smallest.
|
|
Let us explain what the dependencies are:
cortex-m-rtprovides a macro#[entry]used to indicate the “main” function of our program.panic-haltprovides a “panic handler” function which is used by Rust to fallback whenever the program fails. In an OS managed environment, panicking just make the process abort, but on bare-metal we just enter an infinite loop until the device is reset.stm32f4xx-halis a generic HAL crate that is common to all the STM32F4xx MCUs. We provide it with thestm32f401feature flag to make sure the crate is compiled with the bindings for our device.
Here, we are using the the crate stm32f4xx-hal, which provides the HAL bindings we will be using.
This crate itself relies on the stm32f4 PAC crate which is generated from the .svd files of the STM32 device.
The GitHub repository of the stm32f4 does not contain any generated file, but only the source files and the “generation step” toolchain.
If one is interested in looking at the actual generated code, they can read the docs.rs hosted sources.
Also, reading the documentation of the svd2rust crate, might help, as it explains the generation process with more details.
Next, we need to give Cargo some additional configuration for it to properly build the project for a bare metal device.
This configuration is to be placed in a .cargo/config.toml file in the project.
|
|
- The
targetentry is to avoid giving the--targetparameter everytime when building the project. - The
rustflagsallows Cargo to provide a custom script to the linker. The fileTlink.xis provided by the dependencies.
Also, the TLink.x script expects to find a memory.x file defining the size and starting address of the Flash and RAM of the device at the root of the project.
Let us create it and populate it with the correct values (found in the memory mappings section of the datasheet).
|
|
For now, we will change the main.rs to look like this.
It is a simple program just looping indefinitely, to avoid returning from main.
|
|
Finally, your environment should look like this:
stm32_blink/
+---.cargo/
|   +---config.toml
+---src/
|   +---main.rs
+---Cargo.lock
+---Cargo.toml
+---memory.x
This configuration builds successfully, we have no more error when running cargo build.
It’s time to start programming !
Step 2: Coding a blinky LED
Let us try to do the following: every second, the builtin LED on the board should change state. For this, we will need to manipulate:
- GPIO outputs
- Timers and clocks
Rust programs are similar to those in C, in the way that we can distinguish 2 distinct pieces of code : the setup and the loop.
For example, when using C to program an Arduino, we use 2 functions setup() and loop().
In Rust, we only have the main() function as described above.
Therefore, we will write setup code before the loop scope, and loop code in the loop scope.
(unexpected, isn’t it ?)
|
|
Note: It may be the first time you encounter the
!return type. It is actually the way to represent non returning function in Rust, and distinguish it from a function returning unit()(Rust equivalent for void).
As per the board datasheet, the GPIO pin wired to the builtin LED we want to control is PA5, namely the 5th pin of the GPIO register A.
The first thing to do is to get access to this pin. Here is how we do it:
|
|
Note: We use a
.split()method on the GPIOA element to take ownership of this GPIO register only.
Then, we need some way to sleep for 1 second. To do so, we will use timers and clocks.
|
|
We will detail what happens here. First, we fetch the RCC (Reset and Clock Control), which is responsible for configuring the clock input source. Then, we configure (cfgr) it to use the HSE (external oscillator) running at 8 MHz, and freeze it, to apply the configuration and initialize the clock. Do not worry about using an external oscillator, there is nothing to add to the board. The clock source we are using is indeed out of the STM32F401 chip, but is placed on the Nucleo board.
Note: You can use another clock source, like
sysclk. I had trouble setting it up though, and the board wouldn’t react even though the program was flashed correctly. I used GDB to debug it and realized an error made the program panic because the given frequency was too low. The good news is that Rust programs are as easy to debug as C programs ! 👍
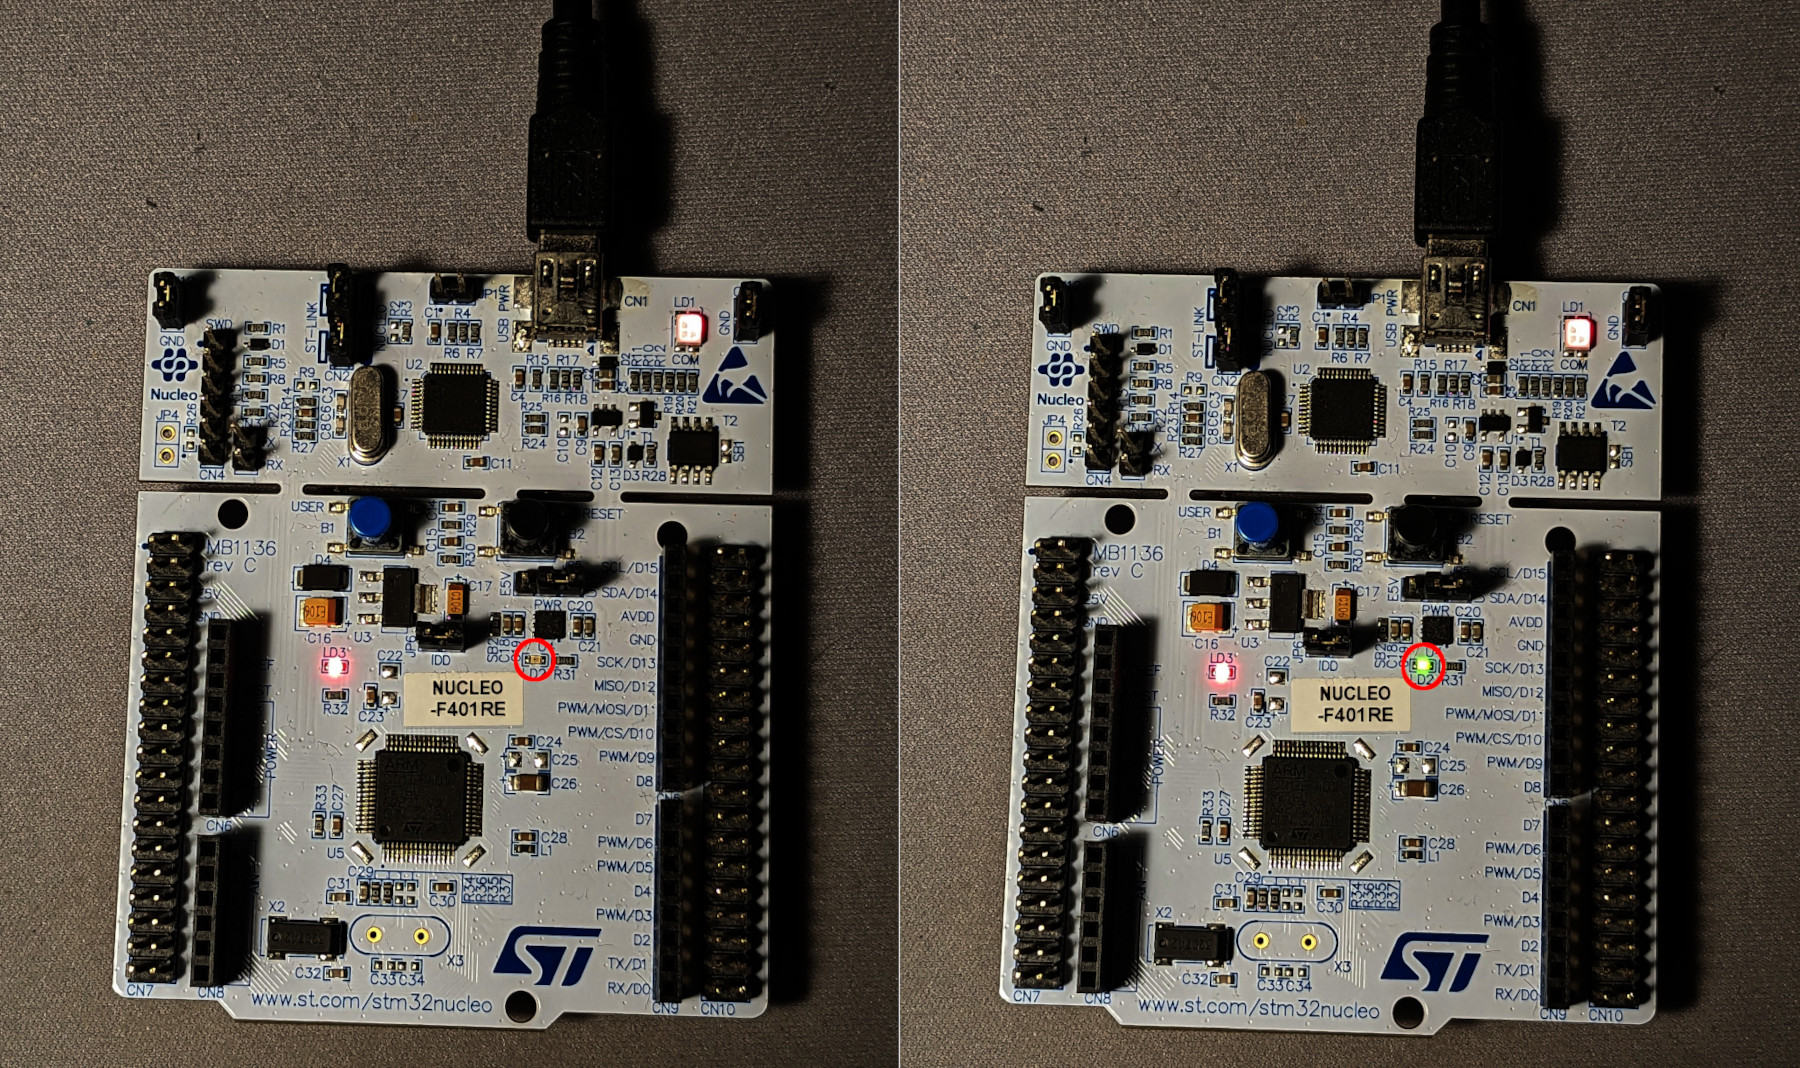
Now, we can make our blinking LED like this:
|
|
The next step explains how to flash the program directly on the Nucleo device.
Step 3: Flashing on the device
The first thing to do to flash the STM32 card is to make sure it is connected to our computer and correctly detected.
We use lsusb to list the currently detected usb devices, and to assert the device is present.
$ lsusb
...
Bus 001 Device 003: ID 0483:374b STMicroelectronics ST-LINK/V2.1
...
It might be necessary to play with your udev rules so the device can be accessed by the flashing tool, but we will not elaborate on this, as it goes outside of the scope of this tutorial. If you run into such problems, this tutorial might be of some help.
The easiest way to flash our binary on the device is to install the cargo-flash cargo package.
This will give us access to the cargo flash subcommand.
cargo install cargo-flash
Once installed, the only thing left to do is this command.
cargo flash --chip stm32f401re --release
If everything goes well, the output of the command should look like this.
    Finished release [optimized] target(s) in 0.05s
    Flashing /home/renji/projects/stm32_rust_blog/stm32_blink/target/thumbv7em-none-eabi/release/stm32_blink
        WARN probe_rs:config::target   > Using custom sequence for ARMv7 STM32F401RETx
     Erasing sectors ✔ [00:00:00] [####################################################] 16.00 KiB/16.00 KiB @ 41.33 KiB/s (eta 0s )
 Programming pages   ✔ [00:00:00] [######################################################] 1.00 KiB/1.00 KiB @ 19.12 KiB/s (eta 0s )
    Finished in 0.457s
By now, the board should be blinking ! Hurray ! 🎉
Binary file size
It is interesting to note that the size of the produced binary is 144 KiB. This is almost the same size than the C equivalent program generated through the STM32CubeMX program, which is 141 KiB. This 3 KiB difference is really encouraging, knowing that the reference C program is made with the official STM32 tools.
Conclusion
This article went over the benefits of Rust over C for embedded programming and the current landscape of Rust embedded programming, and covered a tutorial to programming an STM32 development board with Rust.
We saw that Rust has multiple advantages that make it a more than ever desirable alternative to the C/C++.
Even though it was not covered in the article for the sake of simplicity, remote debugging on the device through GDB is working flawlessly, which is something I personnally wasn’t expecting.
However, it is safe to say that the Rust embedded environment and tooling is definitely not yet mature enough to be an industrial grade competitor to the good’ol C/C++.
For example, the issue I faced when using the sysclk was not straighforward, and this is something which is automatically handled by the STM32CubeMX software when working with C.
Also, generally speaking, the HAL and PAC crates lack good documentation, mostly because they are automatically generated from device description files. This makes it difficult to understand the actual API served to the user.
All in all, the current status of embedded Rust looks very promising for the future, and we can only hope that it gains in popularity, to further enhance the already very nice ecosystem.
Going Further
If this article interested you, maybe consider taking a look at these resources, which are very complete and dive into the details of the topic that were presented here.
- Remind yourself of the Rust borrowing principles with the chapter 4 of the Rust Book.
- Read the Rust Embedded book, it is the official tutorial maintained by the Rust Embedded Working Group.
- Consult the awesome-embedded-rust repo, which centralizes a lot of resources.
- Take a look at ApolloLabs.bin blog, which makes very detailed and more diverse tutorials about embedded Rust.
- Check if your exotic architecture is supported by the Rust compiler by looking at the Rustc Platform Support.
-
I am definitely not talking about autotools here ↩︎