Prerequisites
This post is aimed at programmers that are interested in, or at least curious about, kernel development.
It does require knowledge of computer architectures, C and assembly
(regardless of the architecture).
You’ll also need to understand the compilation pipeline a program written in C
goes through, particularly the compilation and linking phases.
If this is not the case, here’s
an article that can help you learn about it.
You will also need to be knowledgeable about the
ELF format, or at least about sections.
No prior kernel development experience is required. This guide is here to unravel the intricacies of x86 kernel development, breaking down the process into manageable pieces for beginners.
Introduction
The goal of this article is to go through the first steps every kernel programmer went through, and make our computer write a simple message to the screen.
We will walk together through the first few steps of this adventure, setting up the environment, booting for the first time and interacting with your first peripheral: the computer’s screen.
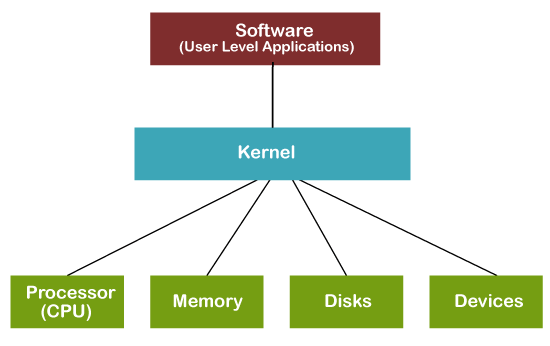
But first, what does a kernel do exactly?
According to osdev:
Its responsibilities include managing memory and devices and also providing an interface for software applications to use those resources
There exist multiple types of kernels for all architectures, ranging from the
most common ones such as IA64 or ARM, to lesser-known ones like MIPS.
Some kernels even support multiple architectures, the most famous example of this
this being the Linux kernel.
To keep things easy for us, we will be using a standard and “easy” architecture,
commonly used by beginners: Intel’s 32bit x86.
Cross Compilation
If you know about compilation and the different computer architectures, you know that an executable compiled on a given computer won’t necessarily work on someone else’s machine (without taking into account other aspects of the compilation process such as libraries). This is because the instruction sets used by both computers can be different. But what to do if I want to compile my program, let’s say on my brand new Intel i5 processor, for my friend that uses the latest M3 Macbook?
One solution: Cross-Compilation
We can split the previous situation into 2 distinct parts: the computer we compile the program on (HOST), and the one on which the program will be excuted (TARGET). To solve the problem, we simply need a compiler, that can be executed on the HOST machine and that produces a binary executable on the TARGET computer. That’s exactly what cross-compiling a program is.
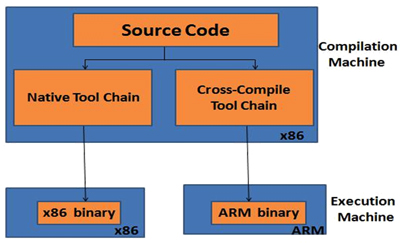
In this article, we’ll be using GCC, which does not support cross-compiling by default.
We will need to build our own version of it, runnable on our machine (x86-64 in my case),
and that produces code for the x86 architecture.
Compiling your cross-compiler
The first step for building our own GCC cross-compiler is building the toolchain
used by our custom GCC, namely binutils.
Similarly to the cross-compiler, the toolchain will be runnable on our system,
but handle code for another architecture.
|
|
Now that we have the correct toolchain available in our PATH,
we can finally compile our own cross-compiler.
|
|
And here we go ! We now have our own cross-compiler for our desired architecture!
Booting Into My kernel
As for any regular kernel, being Windows’ NT or Linux, the first step after booting our PC is to find the kernel’s code and execute it. This is the responsibility of the bootloader.
For our kernel to be bootable we need to make it so that GRUB (our bootloader) can detect it and run it correctly.
Thankfully for us, there exists a common standard for bootable programs:
multiboot.
To make it simple, if our bootable piece of software defines a .multiboot section,
containing information about the executed code, any Multiboot-compliant
bootloader (that supports this convention), will be able to boot it.
This includes GRUB.
So … let’s define these headers inside a first assembly file:
|
|
The included
multiboot.hheader is available here
If you’re curious about what these values mean, you can check out the official reference.
Once a bootable program has been compiled with these headers, we can create an
ISO out of it.
|
|
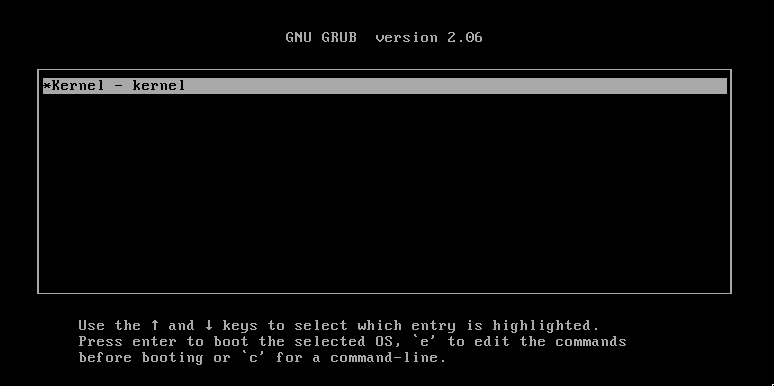
We can now start a virtual machine, booting onto this freshly generated iso file.
For that, we will use qemu, an emulator available on
linux that supports a lot of different hardwares, architectures and peripherals,
including ours.
|
|
A first entry point
Now that we know how to boot into an already existing program, what’s left to do is … well, actually writing our kernel.
When we compile an executable on Linux, the compiler automatically generates the necessary sections during the linking phase. Unfortunately, this is not the case when compiling our own kernel. We now have to define these different sections, as well as the entry point for our kernel’s code ourselves.
When compiling a regular program, the compiler links a certain file, crt0.o,
which contains the _start function.
This very function will in turn be called, setting up the execution environment,
then calling our standard main function.
Sadly, this file is not linked when using our cross-compiler, we have to rewrite
it and link it ourselves.
To summarize, we need to write 2 files:
crt0.s, which sets up the environment and calls our main function- a linker script, to define the different sections within our kernel’s code
| crt0.s | linker.ld |
|---|---|
|
|
These few lines of code can seem scary, but it’s nothing to be afraid of. Let’s analyze it together!
For our processor to be able to execute our code correctly, we MUST respect
a certain set of rules!
We call those the ABI.
The _kernel_start function only makes sure we respect those conventions before
calling the main function, this includes:
- The stack must be aligned on 16 bytes when calling a function
- The stack grows upwards (&
stack_bottom> &stack_top)
Let’s define an empty kernel_main function inside the kernel.c file,
and … that’s all!
We can just compile and link these 3 files together and voilà,
we got our first kernel up and running!
|
|
We use the
-ffreestandingand-nostdlibflag to specify GCC to compile without the standard library (c.f. bibliography)
Writing to the screen
If you built an iso file using this kernel, and booted it using qemu you
would have quickly seen … nothing.
But fear not, that’s normal !
We never actually did anything with our kernel, apart from booting it.
You are now going to interact with your very first hardware peripheral (apart from the CPU itself). And what’s more interactive and fulfilling to start with than writing onto the computer’s display?
What are we working with?
To interact with the screen, we have to interact with the
VGA.
Fortunately for us, on older machines like ours, the VGA includes a text mode buffer
(starting at address 0xB8000), which lets us write characters directly to the screen.
This buffer contains 25 rows of 80 characters/color combinations, each encoded on
16-bits.
The character format is as follows:
|
|
So, to write to the screen, we have to write characters to this buffer. Simple enough right?
Implementation
First, let’s clear the terminal. This is equivalent to filling the buffer with black, empty (space) characters.
|
|
Then, let’s print our desired string:
|
|
Now, we simply have to call this function to print any string we want to the terminal:
|
|
If you recompile again and boot onto the ISO, you should get the following:

And that’s all! Congratulations, you now have successfully finished your first very own kernel!
What’s next
To summarize, in this article we went over:
- How to build your own cross-compiler
- How to boot a kernel
- How to write a kernel
- Interacting with a simple peripheral
But this is only the beginning of your journey to becoming a fully-fledged kernel developer! You now have all the keys to start learning more about this fascinating field.
If you enjoyed the process, and want to learn more, here are a few hints on where to go next:
- Setup the Global Descriptor Table
and learn about memory segmentation
- This table defines memory segments
- Each segment defines a privilege level field: learn how kernel rings are used !
- Setup the Interrupt Descriptor Table
to encounter your first hectic bugs
- Learn how interrupts are triggered by, or sent to the CPU
- Define your own handlers for each interrupt
- Handle keyboard inputs !
- More generally, read through the osdev wiki, it is a great source for learning system-related concepts
- Go look at what others are doing, and find what next peripheral interests you the most! You ought to have fun before anything else :)
The full source code for this article is available on GitHub.