Who This Is For
This guide is designed for beginner makers with some basic experience in electronics and Python programming. Some specific skills that will be helpful:
- Basic knowledge of Raspberry Pi and Linux
- Experience with simple circuits and components
- Familiarity with Python syntax and concepts
- Ability to install libraries and software
- Understanding of electronics safety
No prior robotics knowledge is required. We will walk through the fundamentals of connecting and controlling motors and servos.
More advanced users can follow along for a refresher or inspiration for enhancing the arm with sensors, computer vision, machine learning, and mobile bases.
The goal is to start from first principles and build up to an articulated robotic arm capable of simple automated tasks! Equipped with the core concepts from this tutorial, you can expand your skills into more complex robotics projects.
Introduction
Building your own robotic arm is an exciting way to get hands-on with robotics and Raspberry Pi. In this tutorial, we’ll walk through assembling and programming a 3-axis robotic arm using a Raspberry Pi 3 single board computer and Python.
Some key learning goals:
- Gain experience connecting electronic components like motors
- Understand how to control servos with Raspberry Pi TTL pins
- Learn how to coordinate multiple joint servos for robotic arm movement
- Use Python to program arm control and automation
Robotic arms have many uses - from industrial automation to DIY projects. The skills you learn making your own basic arm can be expanded to create more advanced robotics projects !
Required Hardware
We’ll be using the following main hardware components:
-
RaspberryPi 3 – The brains of our robot, running Python code to control the arm.
-
Power Hub - U2D2 Controller - Alimentation cable – The starter pack from Dynamixel to start playing with motors.
-
3 Motors AX-12A – Compatible motors from Dynamixel with joints.
-
Cable TTL Dynamixel – Link the Power HUB to the U2D2.
By the end, you’ll have an articulated robot arm responding to Python code that sets the angle of each joint !
Raspberry Pi Setup
Before we can start connecting and controlling the servos, we need to get the Raspberry Pi configured :
Install Operating System
First, install the latest Raspberry Pi OS onto a microSD card. The Raspberry Pi Imager tool makes this easy to do on any OS:
https://www.raspberrypi.com/software/
Insert the microSD card loaded with Raspberry Pi OS into your Pi.
You can, in the settings, enable SSH with password authentication. It will save you a step for after.
Enable Interfaces
Next, we need to enable the interfaces that allow us to control the servos :
SSH- Allows remote command line connection to the PiI2C- For general input/outputSerial- For servo communication
Use raspi-config to enable these interfaces:
|
|
Select “Interfacing Options” and enable SSH, I2C, and Serial.
Install Project
Go to my GitHub : https://github.com/Bakadeus/initiation_dynamixel_arm
There you can follow the ReadMe, It will help you to install and get everything you need to work with the arm.
Assembling the Motors
For this step, I can’t provide too much direct guidance. You will need to assemble the 3 motors with the joints provided in the motor kits.
Here is a picture of the final result :
If you need assistance, refer to this guide : https://emanual.robotis.com/docs/en/dxl/ax/ax-12a/ and go to the “How to Assemble” section.
The guide contains detailed instructions and diagrams on assembling Dynamixel AX-12A motors with their mechanical joints.
Make sure the joints can rotate freely and the cables are not too tight when positioning the arm.
Connecting the Motors
Now we need to wire up the servos to the Raspberry Pi. We will connect them in a daisy chain configuration.
Wiring Diagram
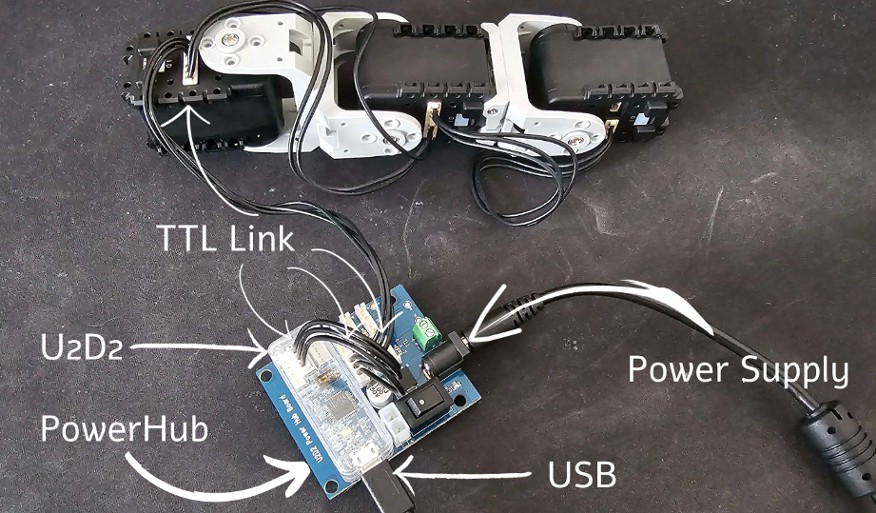
The connections should be made as follows:
Power Hub- Connect directly to the first servo in the chain. The servos will share the power supply.Servos- Link together serially with servo cables between each one.Raspberry Pi- Connect the GPIO serial pins to the remaining servo pins on all the motor.USB power- Separately connect the Pi’s USB power connector. Do not power the Pi from the servos.
Here is a wiring diagram:
graph TD;

    subgraph Servos
        S1(Servo 1)
        S2(Servo 2)
        S3(Servo 3)
    end

    subgraph Dynamixel
        U2D2(U2D2)
        PWRHUB(Power Hub)
    end

    subgraph Raspberry Pi
        RPi(Raspberry Pi)
    end

    PWR(Power Supply) -- Power Cable --> PWRHUB
    PWRHUB -- Servo Cable --> S1
    S1 -- Servo Cable --> S2
    S2 -- Servo Cable --> S3
    PWRHUB -- TTL Cable --> U2D2
    U2D2 -- USB Cable --> RPi
With this daisy chain configuration, the Raspberry Pi can send control signals down the line to each servo. The servos also return status messages to the Pi.
Configure Motors
To configure the motors, the Dynamixel Wizard 2 utility is the best option.
Install Dynamixel Wizard 2 on your computer, connect the arm via USB, and start analysis. It will automatically detect the baudrate, ID, and angle limits foreach motor. You can also modify these parameters in the wizard.
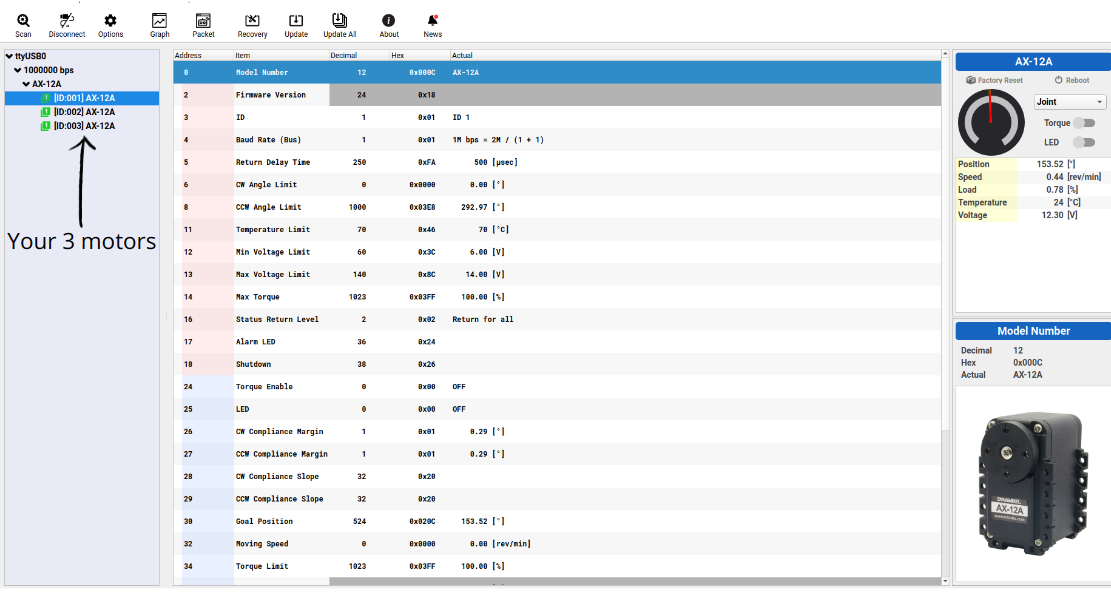
With this information, update the constants in the code to match your hardware :
|
|
The code will detect the ID of each motor as long as they are set to 1, 2, and 3.
Warning
If you have trouble with the serial port connection, try :
|
|
Unplug, plug the arm, and see which port disappears - likely ttyUSB0.
Controlling the Robotic Arm
Now that we have the motors connected and configured, we can start controlling the arm !
To get started, use the Python script in the GitHub repository. This provides a simple example showing how to control the arm using the Dynamixel API.
The best way to learn is to experiment with the code and try different things to understand how it works. Currently in the script you can enter 3 commands :
hello- Make the arm wave hellowalkf- Walk the arm forwardswalkb- Walk the arm backwards
Warning
Watch out, the motors are very powerful ! Do not put your fingers near the joints while the arm is moving - you could hurt yourself. When first testing, start with the arm on the ground to observe the movements safely.
Now you can begin programming your own control logic to make the arm move how you want. The possibilities are endless !
Conclusion
In this tutorial you learned how to build and program a 3 axis robotic arm using a Raspberry Pi.
The key skills covered include :
- Assembling the mechanical structure and electronic components
- Interfacing motors, servos, and sensors with the Raspberry Pi GPIO pins
- Configuring the Dynamixel SDK and Python libraries for servo control
- Writing Python code to coordinate multiple servo motions
- You now have a basic articulated robot that can be controlled manually or automated through programming.
Some ideas for extending this project further :
- Add more degrees of freedom for more complex motions
- Mount a camera or sensor on the gripper for computer vision
- Incorporate object tracking and grasping algorithms
- Create engaging demos and interactions
The skills you’ve learned in terms of interfacing actuators and sensors, programming robot behavior, and problem solving will serve as a solid foundation for future robotic projects you undertake.
If you create something cool with your new knowledge of Raspberry Pi robotics, make sure to share it online !
Going Further
The basic robotic arm you’ve built opens up many possibilities for enhancements and expanded capabilities :
-
Computer Vision- Add a Raspberry Pi Camera module and integrate OpenCV for object detection and tracking. This could enable the arm to autonomously reach for and grasp objects based on camera input. Example -
Voice Control- Use speech recognition libraries like Python Speech Recognition to control the robotic arm through voice commands. This allows more natural interaction with the arm. Example -
Advanced Grippers- Incorporate more complex grippers like multi-fingered designs or soft grippers to expand the arm’s manipulation abilities. Example