Introduction to Atari 2600 Emulation
Prerequisites
For this article, you’ll need the following knowledge:
- Basic C/C++ understanding. (Memory, Pointers, Bits operation, OOP)
- Superficial CPU understanding
Introduction
Who hasn’t downloaded emulators to replay old games out of nostalgia ? Most of us have done it, but who wouldn’t be interested in taking a look behind the scenes and understanding how things really work ? In this article, we will explore the general principles of emulation and how to create your own emulator. I won’t be guiding you through building a full-fledged emulator, but rather, we will focus on the CPU emulation.
Here’s the computer architecture diagram for the Atari 2600:
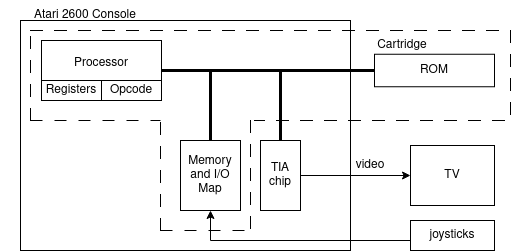
We’re going to focus on the part between the dotted lines.
Emula… what ? 🤔
Definition
According to ComputerHope, in computer science, an emulator is a hardware or software that allows a computer or other device to act as if it were something else. In other words, this means attempting to replicate the behavior of one hardware on another. This technique has gained popularity, allowing gaming enthusiasts to relive the experience of retro gaming consoles on modern computers.
Difficulties
Throughout this tutorial, you will see that programming an emulator is not as hard as it may seem. The most challenging aspect is understanding the precise workings of the console you aim to emulate.
Indeed, manufacturers have no reason to publish the specifications of their consoles, and it’s unlikely to happen anytime soon.
How does it work ?
An emulator works quite simply.
Witness it for yourself:
|
|
The basic structure is common to all emulators. Essentially, it involves observing the necessary operations and execute them. This routine is repeated as long as the console is running.
And what about simulation ?
Emulation involves creating an abstraction of hardware, replicating the external behavior of a given entity to match an existing target. In this process, the internal state of the emulation mechanism may not have to precisely mirror the internal state of the target it’s emulating.
In contrast, simulation aims to reproduce the hardware as closely as possible, creating a model that faithfully represents the internal state of the target. (Example: Modelsim)
| Accurate | Efficient | |
|---|---|---|
| Emmulator | - | + |
| Simulator | + | - |
Am I in big trouble to create my own emulator ?
This is a complex question, and I lack the legal expertise to provide a comprehensive answer.
However, I can offer some insights. If you plan to monetize your emulator on platforms like the App Store or Google Play, you would likely be in violation of the law because you would be profiting from software or hardware that you do not have the rights to use. Even if you decide to offer it for free, it may still be illegal. As mentioned earlier, console manufacturers typically keep the documentation for their consoles private, and gaining access often involves using non-legal methods such as leaks or reverse engineering. This is one of the reasons why older consoles are more frequently emulated, as the manufacturers are no longer actively protecting these consoles, and there may be fewer legal restrictions. So always ensure that the methods you use are legal before starting on console emulation. Because, between you and me, receiving a warning from Nintendo’s lawyers is something nobody wants to experience. 🥶
While we may not need ROMs to create our emulator, they remain indispensable for testing the emulator’s functionality. Let’s delve into an explanation of what a ROM is.
A ROM, short for Read-Only Memory, refers to a digital copy of the game used on the original hardware, in this case, the Atari 2600. These ROMs contain the game code and data that the emulator needs to run the game. Essentially, a ROM file is a snapshot of the game cartridge’s contents.
It’s important to note that the legality surrounding ROMs is a complex issue. While it is generally considered legal to create a ROM from a game you’ve purchased, sharing these ROMs on the internet can cross into illegal territory. Many game publishers and console manufacturers hold the rights to these games, and distributing their ROMs without permission can violate copyright and intellectual property laws. Therefore, it’s crucial to be cautious and respect these legal boundaries when dealing with ROMs in the world emulation.
![]()
Atari 2600
A bit of history
The Atari 2600, initially branded as the Atari Video Computer System (Atari VCS), revolutionized the gaming industry when it was released in 1977. It popularized the use of microprocessor-based hardware and swappable ROM cartridges. Although it started with simple games, the home conversion of Taito’s Space Invaders in 1980 became a huge success. However, Atari’s success was marred by poor decisions, including investing heavily in licensed games like Pac-Man and E.T., which led to the video game crash of 1983. The console’s production ended in 1992 after having sold an estimated 30 million units.

Why choosing the Atari 2600 ?
Here are multiple reasons:
- It’s a retro console with older technology, making it relatively easy to replicate, as modern consoles, especially those after the Game Boy, are quite challenging to emulate.
- It’s well-known enough to have a community that creates numerous projects and documentation, including specifications for the console.
- There are legal game creation tools available, eliminating the need to spend a fortune on buying old games to test your emulator.
Let’s build our Atari 2600 CPU emulator
Enough talk, it’s time to work !
For the next step of this tutorial, we will rely on an online document that contains all the information we need.
Cartridges
First, let’s explore how memory is divided. All the necessary information can be found in the Memory and I/O Map section of the previously mentioned document.
| 0000-002C | TIA Write |
| 0000-000D | TIA Read (sometimes mirrored at 0030-003D) |
| 0080-00FF | PIA RAM (128 bytes) |
| 0280-0297 | PIA Ports and Timer |
| F000-FFFF | Cartridge Memory (4 Kbytes area) |
Sure, for now, we’ll focus on the Cartridge Memory section. This is where the opcodes are stored, and I’ll discuss it in more detail later.
Here’s an implementation of the memory and how to add ROM to the corresponding memory section.
|
|
CPU65XX Microprocessor
CPU Registers and Flags
In any CPU architecture, there are registers and flags, and the Atari 2600 is no exception. Here is the complete list of registers, and I’ll explain what each of them does. They play a crucial role in managing data and controlling the flow of instructions within a CPU, enabling it to execute complex tasks and make logical decisions efficiently.
| Bits | Name | Expl. |
|---|---|---|
| 8 | A | Accumulator |
| 8 | X | Index Register X |
| 8 | Y | Index Register Y |
| 16 | PC | Program Counter |
| 8 | S | Stack Pointer |
| 8 | P | Processor Status Register |
-
The accumulator is a general-purpose register used for various arithmetic and logic operations. It’s often the primary register for working with data.
-
The X/Y register is another general-purpose register that can be used for various purposes. It’s often used for iterating through arrays or memory locations, performing calculations, and as a counter in loops.
-
The Program Counter (PC) is a register that points to the memory address of the next operation to be executed. During the execution of a program, the PC is automatically incremented to move to the next instruction in memory. This process occurs at each clock cycle, and the PC keeps track of where the CPU is in the program’s sequence of instructions.
-
The stack pointer helps keep track of data stored on the stack, and it always starts at the top of the stack (0x00FF in the ram section) and moves downward as more data is added.
-
Flags are simply bits that can change from a value of 1 to 0, or vice versa, depending on the outcome of specific operations. They are used to store information that will be used by other operations later on.
Here they are:
| Bit | Name | Expl. |
|---|---|---|
| 0 | C | Carry (0=No Carry, 1=Carry) |
| 1 | Z | Zero (0=Nonzero, 1=Zero) |
| 2 | I | IRQ Disable (0=IRQ Enable, 1=IRQ Disable) |
| 3 | D | Decimal Mode (0=Normal, 1=BCD Mode for ADC/SBC opcodes) |
| 4 | B | Break Flag (0=IRQ/NMI, 1=RESET or BRK/PHP opcode) |
| 5 | - | Not used (Always 1) |
| 6 | V | Overflow (0=No Overflow, 1=Overflow) |
| 7 | N | Negative/Sign (0=Positive, 1=Negative) |
Here’s the implementation of our CPU:
|
|
Opcodes
In this section, we will learn how to manage opcodes. Opcodes can be handled in three different ways:
- without arguments (cpu.PC += 1)
- with one argument (cpu.PC += 2)
- with two arguments (cpu.PC += 3)
Our goal is to iterate through these opcodes and execute them.
Here’s the implementation:
|
|
Quick understanding of opcode notation
Opcode Addressing Modes
| Name | Native | Nocash |
|---|---|---|
| Implied | - | A,X,Y,S,P |
| Immediate | #nn | nn |
| Zero Page | nn | [nn] |
| Zero Page,X | nn,X | [nn+X] |
| Zero Page,Y | nn,Y | [nn+Y] |
| Absolute | nnnn | [nnnn] |
| Absolute,X | nnnn,X | [nnnn+X] |
| Absolute,Y | nnnn,Y | [nnnn+Y] |
| (Indirect,X) | (nn,X) | [[nn+X]] |
| (Indirect),Y | (nn),Y | [[nn]+Y] |
Zero Page - [nn] [nn+X] [nn+Y] This mode uses a single byte (8 bits) to access the first 256 bytes of memory (from 0x0000 to 0x00FF). Even when you add values like “nn+X” or “nn+Y,” it stays within this limited range.
Absolute - [nnnn] [nnnn+X] [nnnn+Y] To access any location in the full 64K memory (from 0x0000 to 0xFFFF), you need two bytes (16 bits) as parameters. This method is slightly slower due to the additional bytes needed.
Indirect - [[nn+X]] [[nn]+Y] In this mode, you use an 8-bit parameter that points to a 16-bit parameter located in page zero. Despite the CPU not directly supporting 16-bit registers (except for the program counter), this double-indirect method allows for variable 16-bit pointers.
Opcode Notation
You will see in the documents that opcode are listed with this notation:
| Opcode | Flags | Clk | Native | Nocash | Expl. |
|---|
The “Opcode” column represents the specific code assigned to an operation or instruction. The opcode is a number between 0x00 and 0xFF.
The “Flags” column lists the flags that may be affected by the opcode’s operation.
The “Clk” column shows the number of clock cycles required for the CPU to execute the specific opcode. The number of clock cycles depends on the complexity of the instruction and the number of operations required to execute it. The count of clock cycles is crucial for timing and control of our emulated CPU.
The “Native” column was explain above.
The “Nocash” column provide an alternative representation of the opcode.
The “Expl.” column offers a brief explanation of what the opcode does or the operation it performs.
Now that we have see how to correctly understand the different specificity we will overlook some opcode for a better understanding.
CPU Memory and Register Transfers
Register/Immeditate to Register Transfer
| Opcode | Flags | Clk | Native | Nocash | Expl. |
|---|---|---|---|---|---|
| A8 | nz—- | 2 | TAY | MOV Y,A | ;Y=A |
|
|
CPU Arithmetic/Logical Operations
Add memory to accumulator with carry
| Opcode | Flags | Clk | Native | Nocash | Expl. |
|---|---|---|---|---|---|
| 69 | nzc–v | 2 | ADC #nn | ADC A,nn | ;A=A+C+nn |
|
|
CPU Rotate and Shift Instructions
Shift Left Logical/Arithmetic
| Opcode | Flags | Clk | Native | Nocash | Expl. |
|---|---|---|---|---|---|
| 0A | nzc— | 2 | ASL A | SHL A | ;SHL A |
|
|
CPU Jump and Control Instructions
Normal Jumps & Subroutine Calls/Returns
| Opcode | Flags | Clk | Native | Nocash | Expl. |
|---|---|---|---|---|---|
| 4C | —— | 3 | JMP nnnn | JMP nnnn | ;PC=nnnn |
|
|
CPU Illegal Opcodes
The CPU Illegal Opcodes, also known as unofficial opcodes, include a range of instructions that are not officially documented. These opcodes can have unexpected behavior and are generally considered unstable. In general we don’t implement them, and we will do the same.
Implementation to handle opcodes
|
|
Already finished ??? 🤨
As I mentioned, this is just an introduction to emulation, and we’ve begun by focusing on the CPU, which is the heart of our emulator. However, there is still much work to be done. I’ll let you read on for more.
To continue …
Implement every opcode
Implementing every opcode can be a long and challenging process. If you’re finding it too difficult, you can explore existing Git repositories to find and understand certain opcodes. Here’s a link to a repository with some opcode implementations for reference.
Controllers
In the realm of the Atari 2600, controllers are the conduits between players and the digital worlds encapsulated within the iconic console. These input devices serve as the bridge, translating physical movements and actions into on-screen interactions. From the classic joysticks to specialized peripherals like paddles and steering wheels, each controller plays a distinct role in shaping the gaming experience on the Atari 2600.
Video
Having the CPU is great, but implementing video output is essential to fully enjoy your emulator.
Other
There will still be some details to handle, such as timers and sound. But afterwards, you can proudly say that you’ve built an emulator from scratch, which will be a very educational experience, and I highly recommend it.
Go beyond !
Still here ? You certainly search a real challenge ! I might have something for you … how about creating a Gameboy emulator ? It’s a genuine challenge, speaking from my personal experience, and it’s likely to keep you busy for a while. But always remember, Nintendo’s lawyers are watching !