Introduction
When writing an emulator, a critical aspect one will have to to work on is the CPU emulation. The CPU being the “heart” of the system we want to emulate, it will naturally become a hot spot of an emulator, and it is critical to find an optimal way to do this routine. Nowadays, Just-In-Time compilation (or simply JIT) has become the de facto standard for CPU emulation of game consoles. Indeed, many popular game console emulators now rely on it to ensure fast execution on a wide range of devices. These include:
JIT compilation is key in allowing these emulators to work at playable frame-rates. This article will explain how JIT works and how it can be used in order to emulate a game console CPU. We will then see the many advantages of this method compared to a simple interpreter, but also that this method has its own shortcomings and weaknesses.
Prerequisites
Readers are expected to have the following knowledge to fully enjoy this article:
- Familiarity with the concept of emulation
- Moderate C and assembly knowledge
- Basic CPU knowledge (registers, instruction set and opcodes, status flags…)
Note
The practical sections of this article will use the Nintendo Game Boy CPU (a Sharp SM83 to be more exact) as an example target. Rest assured that specific knowledge of the Game Boy inner workings is NOT needed, and everything that will be covered in this article can be applied on the target of your choice.
The traditional approach: the interpreter
To understand why JIT is needed, we first need to cover the “traditional” way of doing it: the interpreter.
What is an interpreter?
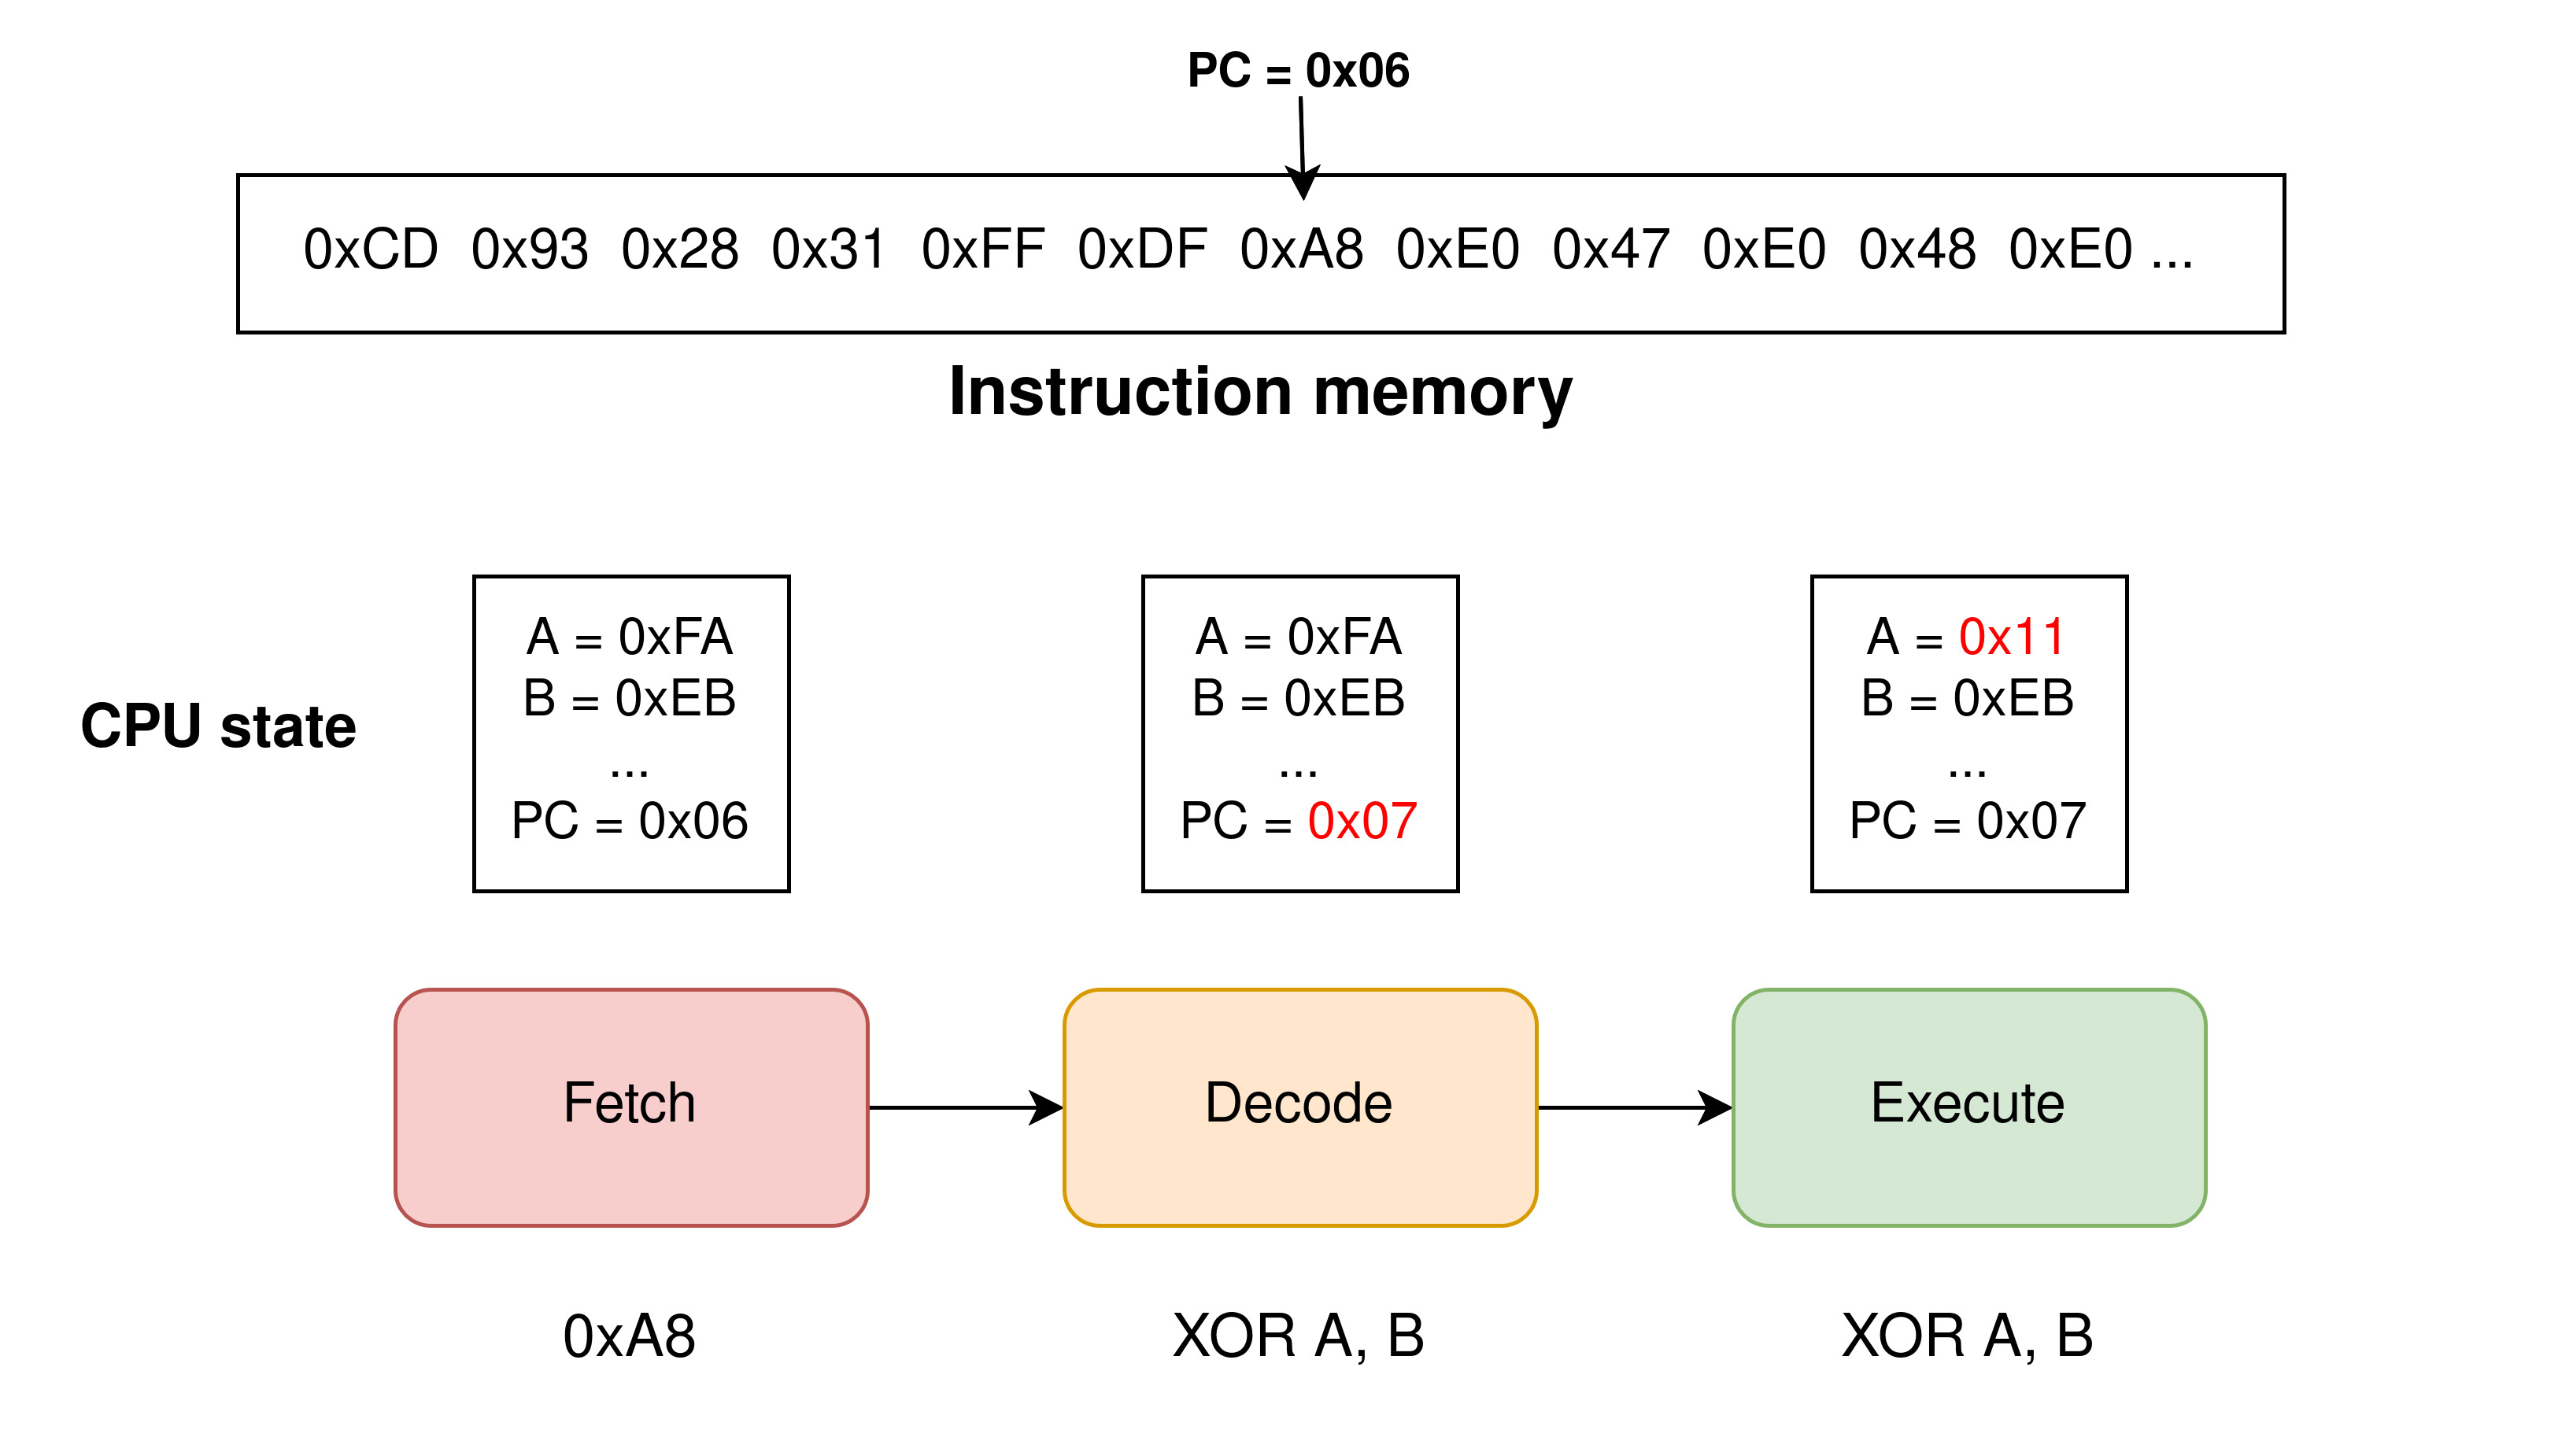
According to Wikipedia , an interpreter is “a computer program that directly executes instructions written in a programming or scripting language, without requiring them previously to have been compiled into a machine language program”. Applied to the context of a video game console emulator, the instructions to execute will generally take the form of binary opcodes written in a ROM file supplied to our program. In fact, an interpreter can be seen as a software rendition of what a real CPU would do during its execution loop:
- Fetch: Reading in memory the next instruction
- Decode: What is the instruction that I just fetched?
- Execute: Execute it and go back to step 1
These three steps form what we call an instruction cycle, an interpreter’s job is then simply to repeatedly emulate this behaviour in the main loop of the program. This method is generally the first one implemented for an emulator project, as it is the most straight-forward to write and is very intuitive to work with.
A very easy approach to CPU emulation…
To prove how easy it is to implement, here is a stripped-down version of the interpreter used in my own Game Boy emulator GemuProject:
|
|
As you can see in the next_op function above, decoding instructions can be as
easy as using a switch statement (though speaking from experience I wouldn’t
recommend sticking with a giant switch: it will quickly get messy!).
Warning
Keep in mind this snippet is simplified compared to the real thing! This code is focusing only on the instruction handling part, and in the case of the Game Boy many things are missing such as interrupt handling and cycle counting among others.
This process can be applied to any target CPU, i.e. any game console. The it just works aspect underlying this approach has been the reason why so many emulators (even the most demanding ones) still provide an interpreter fallback in their settings, even if they are generally reserved for debugging purpose nowadays.
…but an inefficient one.
While functional, this approach leaves a lot to be desired when it comes down to performance. Indeed, writing an instruction cycle like this is very inefficient software-wise:
- We can only process (fetch/decode/execute) one instruction at a time
- The translation process is slow by itself, introducing a huge overhead
- But most importantly: the translation is done from scratch every single time! There is no caching of the results whatsoever.
Thankfully, such overhead is not a big deal when it comes to older game systems prior to the 4th console generation (Nintendo SNES, Sega Genesis). These have low enough clock speeds that modern hardware can easily handle emulating at full speed anyway. Starting from the 6th generation of consoles (Nintendo GameCube, PS2, Dreamcast) in particular is where performance problems get too important to be ignored, especially on low-power devices such as mobile phone or handheld PC like the Steam Deck. You can see the results for yourself when attempting to run Mario Kart Wii on an iPhone 15 Pro Max using Dolphin’s interpreter:
Introducing Just-In-Time (JIT) compilation
What is JIT?
Just-In-Time compilation (also sometimes refered to as “Dynamic [re]compilation”) is a way of compiling code at runtime, as opposed to the more traditional static compilation process entirely done before execution. Generally, JIT compilers are used to translate a bytecode to machine code targeting the host CPU, but they could also be used to translate source code directly, although pretty uncommon. JIT can be seen as an “in-between” alternative to the classic compiler/interpreter opposition, its goal is to have the benefits of both sides:
- Fast execution (compiler)
- Portability, flexibility, ease of implementation by avoiding the compiling process (interpreter)
A little bit of history
While JIT has been used extensively in the game emulation space for quite some time now, the concept actually predates console emulators by a long shot: the very first mention of a JIT compiler has been made by John McCarthy for the LISP programming language in 1960!
It started gaining traction in the game emulation scene in the 2000s as a means to overcome the performance bottlenecks of purely interpreted emulators. Perhaps the most influential emulator in this space was Dolphin (GameCube/Wii), which started experimenting with it way back in 2008.
How does it work?
The JIT compiling process can be divided in two parts:
- Part 1: generate a native host code at runtime from target code (this is the hardest part)
- Part 2: execute that generated machine code when needed
Starting with Part 1, it first reads from memory instructions to translate, and will proceed to produce from that what we call “blocks” and store them in an executable buffer. Simply put, a block is a sequence of instructions (generally a linear one but not necessarily) that has been translated to machine code for our host machine’s CPU. This means that once a block is generated by the JIT compiler, it can be executed just like an ordinary function!
Processed blocks are generally stored in a data structure (commonly a hashmap
indexed by the value of the PC register) to be accessed later by the emulator
as many times when needed (this is Part 2).
This caching of blocks is technically not mandatory but is essential to avoid
having to recompile the same things over and over, in which case you’d miss
out on much of the performance gain that comes from JIT.
Let’s write a pseudo-JIT!
To better understand what that means in practice, let’s try to implement a pseudo-JIT ourselves. Our goal here will be to implement a few instruction of the Game Boy instruction. The chosen instructions are the following:
| Mnemonic | Opcode (hexadecimal range) | Description |
|---|---|---|
| ADD A, R8 | 0x80-0x87 | Add to A the value stored in register R8 |
| AND A, R8 | 0xA0-0xA7 | Set A to the bitwise AND between the value in R8 and A |
R8 can be replaced with any 8-bit sized register (hence the opcode range).
For context, here are all the registers of the Game Boy CPU.
| Register | Size | Description |
|---|---|---|
| A | 8-bit | Accumulator |
| F | 8-bit | Flags (Z, N, H, C - mapped on the 4 MSB) |
| B | 8-bit | General-purpose register |
| C | 8-bit | General-purpose register |
| D | 8-bit | General-purpose register |
| E | 8-bit | General-purpose register |
| H | 8-bit | General-purpose register |
| L | 8-bit | General-purpose register |
| SP | 16-bit | Stack Pointer |
| PC | 16-bit | Program Counter |
The following C structure will be used to represent the CPU state:
|
|
Info
The following code snippets are made for a GNU/Linux environment running on an x64 architecture, and will probably not work on other configurations.
Creating an executable buffer
As specified earlier, we first need to allocate an executable buffer.
Simply using malloc(3) as usual won’t work here, we specifically need
execution permissions that are not granted by default.
To achieve this we can use mmap(2) instead with the flag PROT_EXEC which
will do the trick:
|
|
Of course we also add the PROT_READ and PROT_WRITE flags to get the usual
read/write permissions.
Preparing our block and defining a calling convention
Now that have a buffer, we need something to fill it with! But before writing our assembly logic we need to ensure that we have a way of entering and exiting our JIT block. In other words, we need to write a function prologue and epilogue that follows our system’s ABI (System V for us). We also need to decide on a calling convention for our JIT block. For this example we will assume our block will take only one argument:
- a pointer to a
struct cpu(will be stored in therdiregister)
Our block can be assimilated to the following function signature:
|
|
For now, a prologue that simply pushes the stack base pointer before setting
rbp to rsp will be enough.
We can then restore rbp in the epilogue and use the ret instruction to exit
our block.
|
|
Generating assembly code
We can finally tackle the translation process!
We need to write a code emitter for each instruction we want to translate.
A code emitter is a function that generate assembly code inside our executable
buffer.
Let’s try to write an emitter for the AND A, r8 instruction.
Such an instruction in C could be emulated with a function like this:
|
|
We could figure out an equivalent assembly code ourselves but it would be pretty inconvenient (and we are lazy!). What we can do to help us is compiling this code and checking its assembly output (gcc on Godbolt works).
Info
You might be wondering why R8 is retrieved in such an odd way (why not just
pass it as an argument?) and why it is hard-coded to B in this code.
This is purposefuly done to generate an assembly code compatible with our
calling convention.
Had we used a second argument, we would have a mismatch between the signature
defined in our calling convention and the one of and_a_r8.
In that case, the generated assembly code would have to be adjusted by hand.
We get the following assembly for and_a_r8 using the -O1 optimization flag
(allowing the compiler to remove the unneeded function prologue/epilogue):
|
|
We can then use this to write our first code emitter:
|
|
Notice the change on the second line of instruction: instead of having the B
register (offset = 2) hard-coded, we use an argument r8_offset to choose
which register to use as R8. Handy!
Tip
Manually writing instructions in binary can quickly get tedious. If you’re looking to dive deeper into JIT, I’d recommend checking assembly preprocessing librairies such as DynASM to ease code generation.
The same methodology can be applied for ADD.
Writing its code emitter is left as an exercise for the reader :).
Building our first JIT block!
Now that we have our code emitters we can finally build a block! This is simply a matter of constructing a sequence of instructions inside the executable buffer. To test our JIT, let’s write the following sequence of instructions:
AND A, B
AND A, C
ADD A, D
ADD A, B
ADD A, E
For testing purpose, we will have to put some default values inside our CPU registers.
|
|
We get the following output:
CPU State:
 A: 0x6B  F: 0x10
 B: 0x0A  C: 0xF4
 D: 0xE0  E: 0x81
 H: 0x00  L: 0x00
 SP: 0x0000  PC: 0x0000
Phew, we made it!
That’s all folks… or is it?
This is of course just an introduction, and there is a lot of work remaining to make it into a usable JIT compiler for use in an emulator. Some things that would need to be tackled on are:
- The Block Delimitation Problem: how does one define a relevant block size , and when to start/stop a block? This is a complex subject, and there are countless valid implementations, each with their benefits and weaknesses.
- Result caching: once a block has been compiled, we don’t want to throw it
right away! A hashmap system indexed by the value of the
PCregister could work for example, it would allow our program to avoid recompiling a sequence if it has been already processed before. - More code emitters: only two of them won’t cut it! We need to be able to translate the whole instruction set of the target console.
The limits of JIT
JIT is a fantastic tool allowing us to get great emulation performance. However, it does have some drawbacks that need to be adressed by developpers resorting to it.
Hard to work with + portability issues
As you saw in the practical section, a JIT compiler has to be tailored for a specific target architecture. Unlike an interpreter which can be written once and then largely set aside, JIT needs a lot more work and maintenance to achieve portability. It is also way harder to debug because of its runtime code generation, and its behaviour can vary from one architecture to another.
Security concerns
One of the key tradeoffs of JIT is that we need to mark pages of memory as both writable and executable. This effectively violates the W^X (Write XOR Execute) security policy, which aims to disallow simultaneous write and execute permissions on memory pages. If an attacker were to find a way to write into the executable buffer used by the JIT compiler, they could execute arbitrary code. This constitutes a JIT spraying attack. These security issues are notably what led Apple into forbidding all usage of JIT compilation for apps published on its iOS AppStore (and thus despite their recent guidelines change allowing game emulators).
Potential accuracy issues
One advantage of the interpreter over a JIT compiler is the control it gives us over the emulation. With an interpreter, we only process one instruction at a time, giving us full control of events timing to ensure accurate emulation. Using JIT, we temporarily pass the control to the host CPU to execute multiple CPU instructions at once. While this is fast, this limits our ability to synchronize all emulated components accurately, which can potentially lead to accuracy issues unseen on an interpreter.
Conclusion
JIT compilation offers an efficient way to execute code from one platform on another by translating instructions dynamically during runtime. This approach can significantly boost performance compared to purely interpretive methods, enabling emulation of the much more demanding hardware of modern gaming systems. However, JIT emulation also introduces new challenges compared to the interpretive approach that need to be taken into account when writing an emulator.
Going further with static recompilation
After learning about JIT, you may have thought: Couldn’t we simply compile the whole game before execution? We do it all the time with compiled languages anyway! And if so you are not the only one! Static recompilation does exactly that by performing the full translation of code ahead of time. This approach eliminates the overhead of translating instructions on-the-fly, resulting in potentially even better performance compared to JIT. However, this experimental method comes with a whole new set of challenges and issues, and this is a story for another article…